The teaching methods I use for solving equations have changed drastically over my (relatively short) career so far, so here’s a post about my journey so far and current “tried and tested” ideas.
1. Why animal algebra doesn’t work
One very clear memory I have of my time at school is the first term of work I did in Year 7. My teacher was properly “old-school” – he’d demonstrate for 15 minutes, then we’d work in silence for the remaining 45 minutes on similar problems. He was the deputy head, and we were all pretty terrified of him; while I don’t want to debate if that’s a good teaching model or not, one thing that really stuck with me was that first term’s work – we did nothing but solving equations, pretty much from September until Christmas. It wasn’t just simple linear though; we went all the way to solving quadratics using the formula, although I confess I didn’t really know what I was doing or why I was doing it. As a result, I’ve always loved algebra and been pretty good at it (conversely, my geometrical reasoning skills are pretty dire).
He taught us equations by drawing see-saws with cats, dogs, elephants and frogs perched on one side, and numbers on the other. Gradually the animals disappeared to be replaced by letters, until we were solving some pretty complicated equations, including unknowns both sides, negative and fractional answers and coefficients.
Because it stuck with me so much, I tried it when I started teaching. Didn’t work in the slightest; here’s a prime example of having to find your own ways of explaining things – what worked for a group of top set kids in a pretty high-attaining middle school in Staffordshire just didn’t seem to translate to my teaching with kids who had never understood algebra in the slightest and were just bemused by the pictures of animals appearing everywhere. I realised that, although this method had clicked with me, it was clouding the issue for many of my pupils, and I stopped trying to teach animal algebra soon after that.2. Clarity of notation
During the second week of my NQT year, we had a department Ofsted – as I discovered later, the lady who observed me was Jane Jones, their mathematics leader, and our school was one of those used to compile their “Mathematics: Made to Measure” report published in 2012. As I was absolutely petrified at the thought of big ol’ scary Ofsted turning up when I’d not even got settled in, I was pleased that my lesson went OK. However, in my feedback, Jane mentioned one thing that I’d not even thought about before – the way that my presentation was confusing some of the pupils:
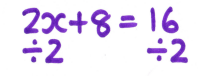

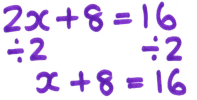
At this stage, I was in the habit of writing the inverse operation below the equation before doing the next line of working.
Although this worked fine for most pupils, some were getting confused about exactly what the “divide by 2” referred to, and were simply dividing the x coefficient by 2, rather than the whole of the left-hand side of the equation.
Some were also mixing up their working with the equation, ending up with lines of working and solution blending into each other and creating even more confusion.
During my second year of teaching, I discovered an A Level pupil solving equations like this:
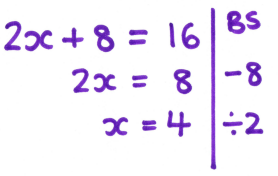
She consistently used this presentation in her working; she explained that she wrote down how she was transforming both sides of the equation on the right-hand side of the line, with her solution on the left-hand side.
I went away and trialled this with my Year 10s; they loved it as a method for organising their working, so I now present all my algebraic working like this.
One major benefit of this is how well it translates to other branches of algebra; I get pupils to include “expand”, “factorise” or “square root” in their right-hand columns when creating examples for revision to remind them exactly what they did to get the solution. It also links in really well to work on inverse functions, as it creates a flow-chart of operations which can easily be followed backwards.
3. Conceptual understanding and modelling
Once I’d got my notation sorted, I started thinking more critically about the conceptual issues pupils were having with solving equations. My teaching at this point was still mostly procedural; do one example, then get the pupils to practise loads more. I think there’s still an argument for doing this, as fluidity in solving equations is so important for higher-level topics, but I think I was teaching the process and hoping that understanding would miraculously appear later (it didn’t).
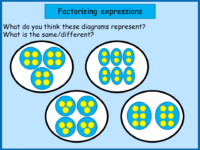
Following on from my experience on the NCETM course last year, I started to try and incorporate more ideas about modelling situations into work across the board. I also took a different approach to the whole topic; before even going near solving equations, I got pupils to build their own. I used Fred and George (yes, the Harry Potter twins – they pop up a lot in my random examples), who have to have equal money spent on them for presents, and got pupils to model this, using p as the cost of a present.


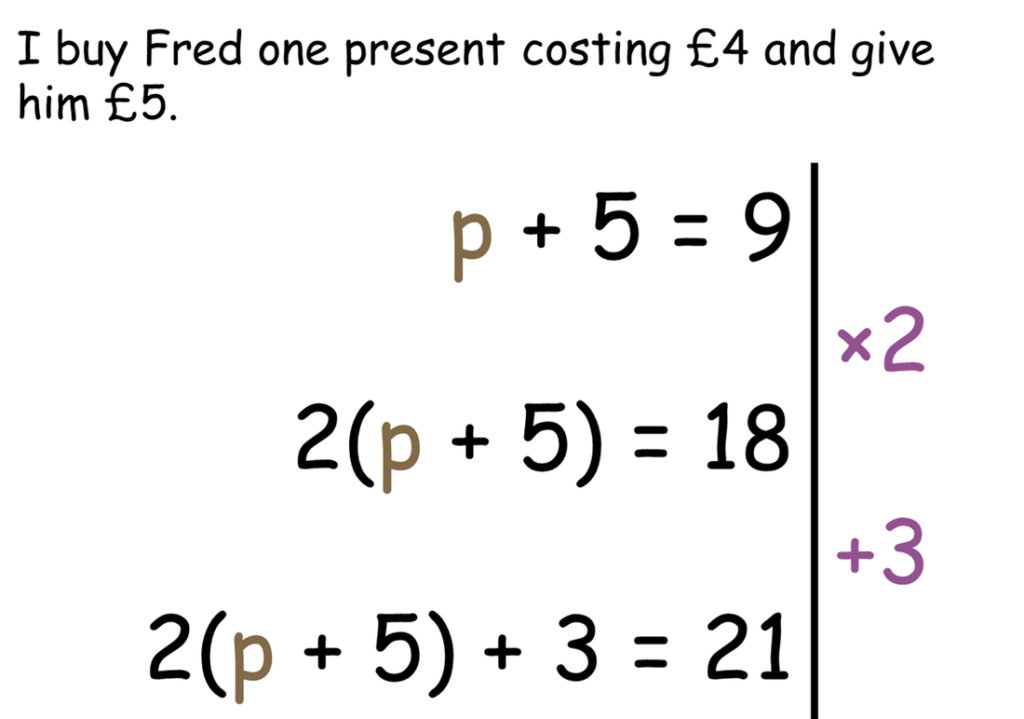
We spent a couple of lessons creating our own equations before even thinking about solving them, and I started to encourage the line notation for pupils to show their working out.
This seemed to work quite well as a conceptual model for them, and was infinitely preferable to using animal algebra, as a present can cost an amount of money, whereas having “a cat is worth 5” is a little meaningless.
By the time we’d finished making up equations, I’d found and started using algebra tiles with my Year 11s to complete the square. I decided to give this a go for linear equations as a way to move from the concrete idea of “a present” towards the more abstract “value of x”.
This worked brilliantly with the groups I trialed it with last year (from high-attaining Year 7s to low-attaining Year 9s), although it’s really important to encourage pupils to show their working algebraically as well – you can see how I do this in the video.
4. Multiple solution methods
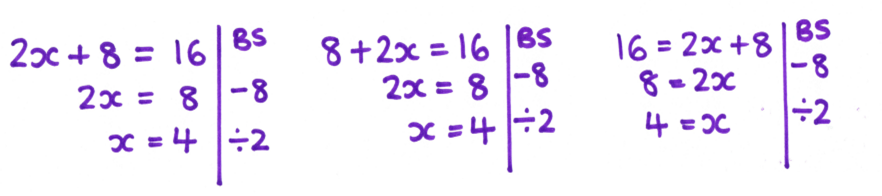
Something that was embedding misconceptions rather than illuminating them was my presentation of examples and problems to pupils. Making up an equation on the spot, I’m more likely to come up with ax + b = c than b + ax = c or even c = b + ax. Now, I’m consciously trying to include examples of equations written every way round and getting pupils to think carefully about what effect (if any) this has.All of these equations are the same, but pupils usually see type 1 in textbooks and on worksheets.
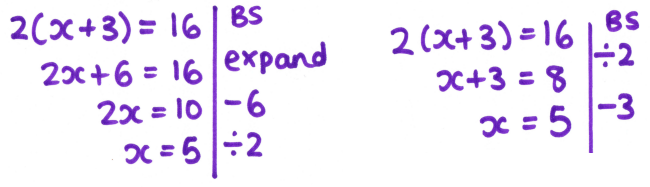
In addition to this, I’m also spending more time looking at alternative solutions, something else which has cropped up more frequently in lessons when pupils are using the algebra tiles rather than following my procedure. I had a lovely discussion with Year 7 last year about the similarities and differences in these two solutions, getting them to think critically about why we subtract 6 in the first example, but 3 in the second.
5. Looking for links
Where possible, I think it’s important that pupils are presented with relevant reasons to solve equations. It’s a great opportunity to link in prior knowledge, such as angles on a line or in a triangle, and get them to construct their own equations pretty much straight away.
I also now teach solving inequalities right after (or sometimes simultaneously to) solving equations. I was initially mystified that pupils who could solve complicated equations well somehow got in a complete muddle with inequalities, and I think some of that is our fault; it’s frequently presented as a completely disparate topic, not touched until Year 10 or 11, rather than essentially the same process with a different symbol in the middle.