How I discovered algebra tiles
I discovered algebra tiles last year when, in a fit of desperation, I took to the Internet to find a good way of teaching completing the square in a way that might actually get it to stick in the heads of my Year 11s.
I’d previously completely failed and confused them all by doing it via “the formula”, and was beginning to wonder if I’d ever manage to teach it properly, a problem compounded by the fact that (if I’m honest), I don’t think I’d ever properly understood why it worked.
Anyway, I found an absolute gem of a worksheet – I’ve just tried looking now and for the life of me I can’t locate it anywhere on Google, especially as algebra tiles really seem to have taken off in the maths education world and there’s a huge stack of resources out there now. Luckily I’ve got a copy saved – it looked like this:
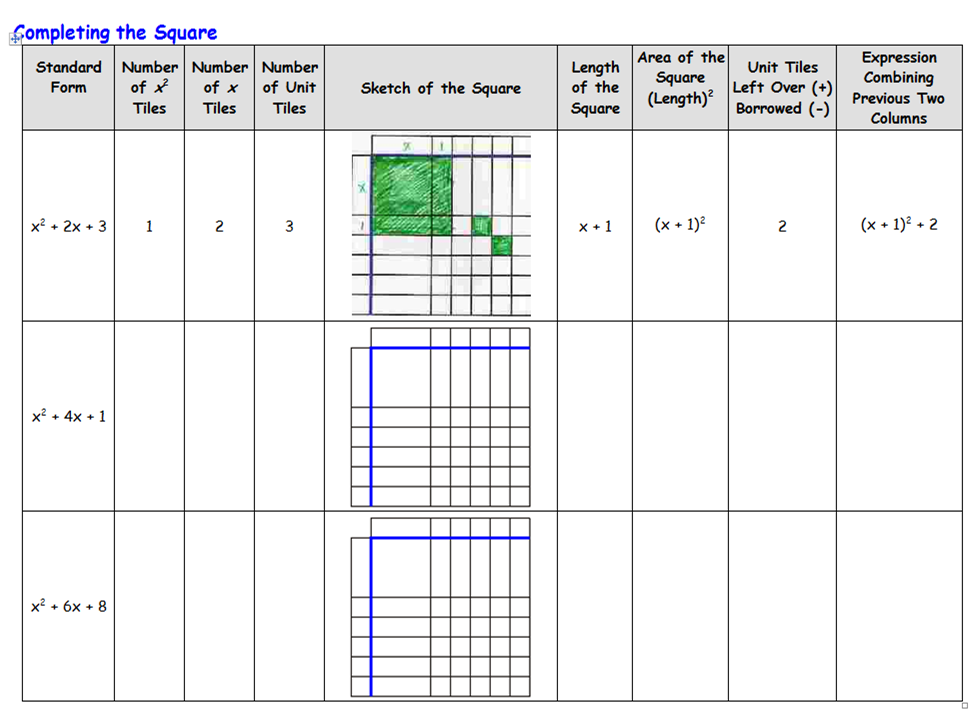
Off I trotted to the photocopier, and Year 11 spent a fairly happy hour solving completing the square problems by looking at units “left over” or “borrowed”. At the end of the lesson, a quick straw poll revealed that over 3/4 of them now understood how to complete the square, and they evidenced it by completing two A* exam questions.
(As an aside to this, I had at least five or six pupils who continued to use diagrams to solve CTS all the way through the GCSE course. When a question came up on the exam paper, guess which pupils got it correct?)
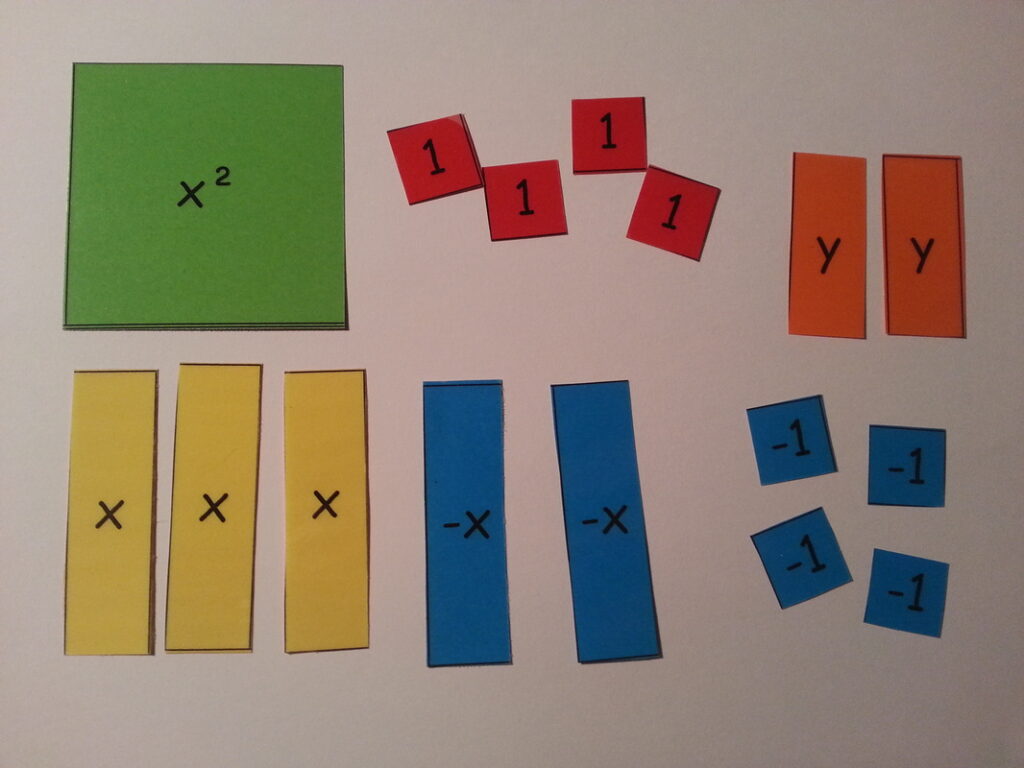
Feeling quite pleased with myself, I popped back to the Internet for a bit more research and discovered that, although pretty scarce last year, algebra tiles were actually a “thing”. They appeared to be more popular in America than over here. I then spent a happy evening or two laminating and cutting out to produce my own sets of algebra tiles:
In the spirit of a year of trying something new, I then decided to try and teach a load of algebra to my classes using the tiles. I taught all the algebra content up to grade B with my Year 7 top set, and for the first time I felt like the pupils really understood what they were doing, and also managed to finally convince a Year 9 that 3x wasn’t the same as x³.
I then got some long-suffering TAs to make whole-class sets for our store cupboard, and although I’ve not got them out much this year (mastery curriculum with lower-attainers means a lot of fractions and multiplication and not much algebra – yet!), some of the rest of my department have used them and loved them.
The only thing I’m not entirely convinced on is using negative tiles. In a similar vein to the issues I had with bar modelling to solve equations with negatives, representing a negative quantity with a positive area can be a bit of a conceptual headache. For now, I’m sitting on the fence as to whether I’d continue to use the negative tiles with pupils, but the positive ones are absolutely essential for providing a concrete model for any algebra skills.
A guide to making your own algebra tiles
Making your own algebra tiles is a really cheap alternative to buying premade or plastic sets, but the trade-off is the initial time investment to create a set. I’d recommend making them using card rather than paper, and consider lamination if you’re planning to use them very regularly.
If you want to make your own, it’s important to get the dimensions right. It’s crucial that you can’t fit an exact multiple of the unit tile along the length of the x tile – this is to stop pupils assuming that x always equals a particular value and avoid issues when factorising.
If you don’t want to mess around making your own templates, you can get mine here – these are printable PDF templates for unit, x and x² tiles.
Making your own templates
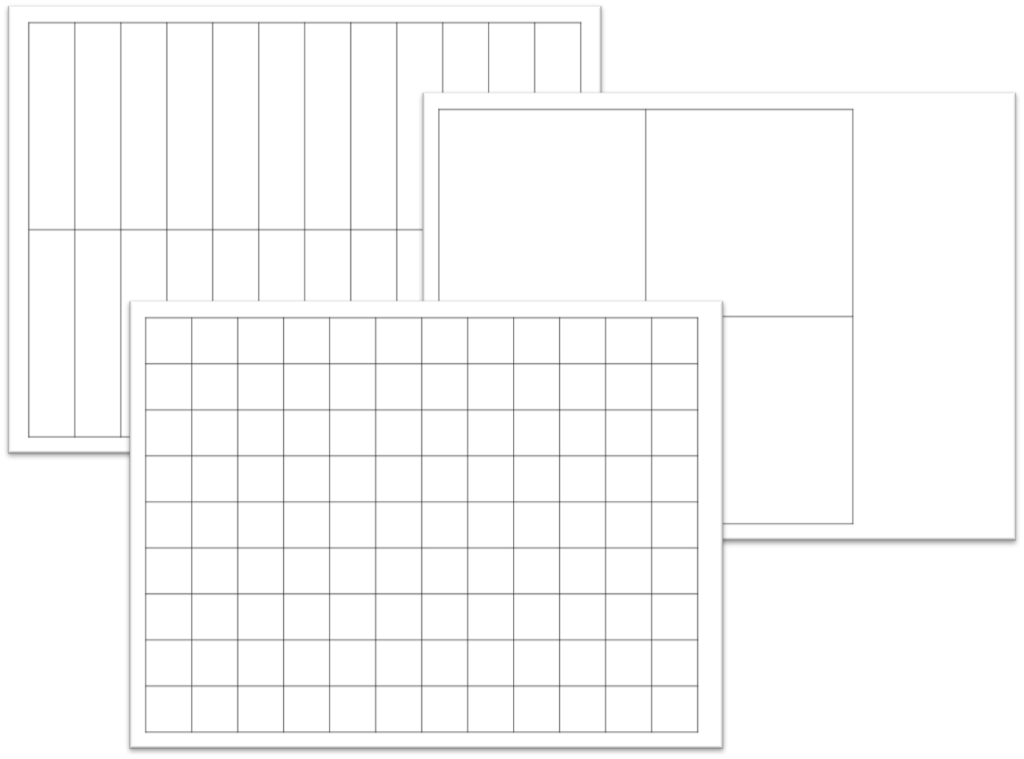
Start with the size of your unit block. These need to be a decent size otherwise they become difficult to manipulate and are easily lost. My templates use 2cm for a unit tile side length which I’ve found works quite well, but some learners may prefer bigger tiles.
The quickest way I’ve found to make a load of identically sized tiles is to create a table in PowerPoint, then set the cell height and width to the required dimensions.
The x tile needs to have the same width as the unit tile, but remember to avoid using an exact multiple of the unit tile for the length.
The x² tile has the same length and width as the x tile (so x multiplied by x gives an area of x²).
It is up to you whether you want to print labels on the tiles. When I made my first sets way back in 2015, I labelled them. My sets now are unlabelled, as this makes them more flexible for using to represent different letters as variables; I don’t always have to stick to x’s in my examples!
Assembling your algebra tiles
Print a set of templates (units, x’s and x²s) onto coloured paper or card. I’ve standardised my tiles and resources now to use the same colours as MathsBot’s virtual algebra tiles, which also seem to match the standard colours for bought resources.
- Yellow unit tiles
- Green x tiles
- Blue x² tiles
- Red for all negative versions
Rather than cut out and make a load of negative tiles (as I did originally), I now make double-sided tiles by just gluing a sheet of red card or paper to the reverse of the template.
Once the glue is dry, cut the tiles out, and voila – you are now the proud owner of a set of algebra tiles for a fraction of the cost of a bought set!