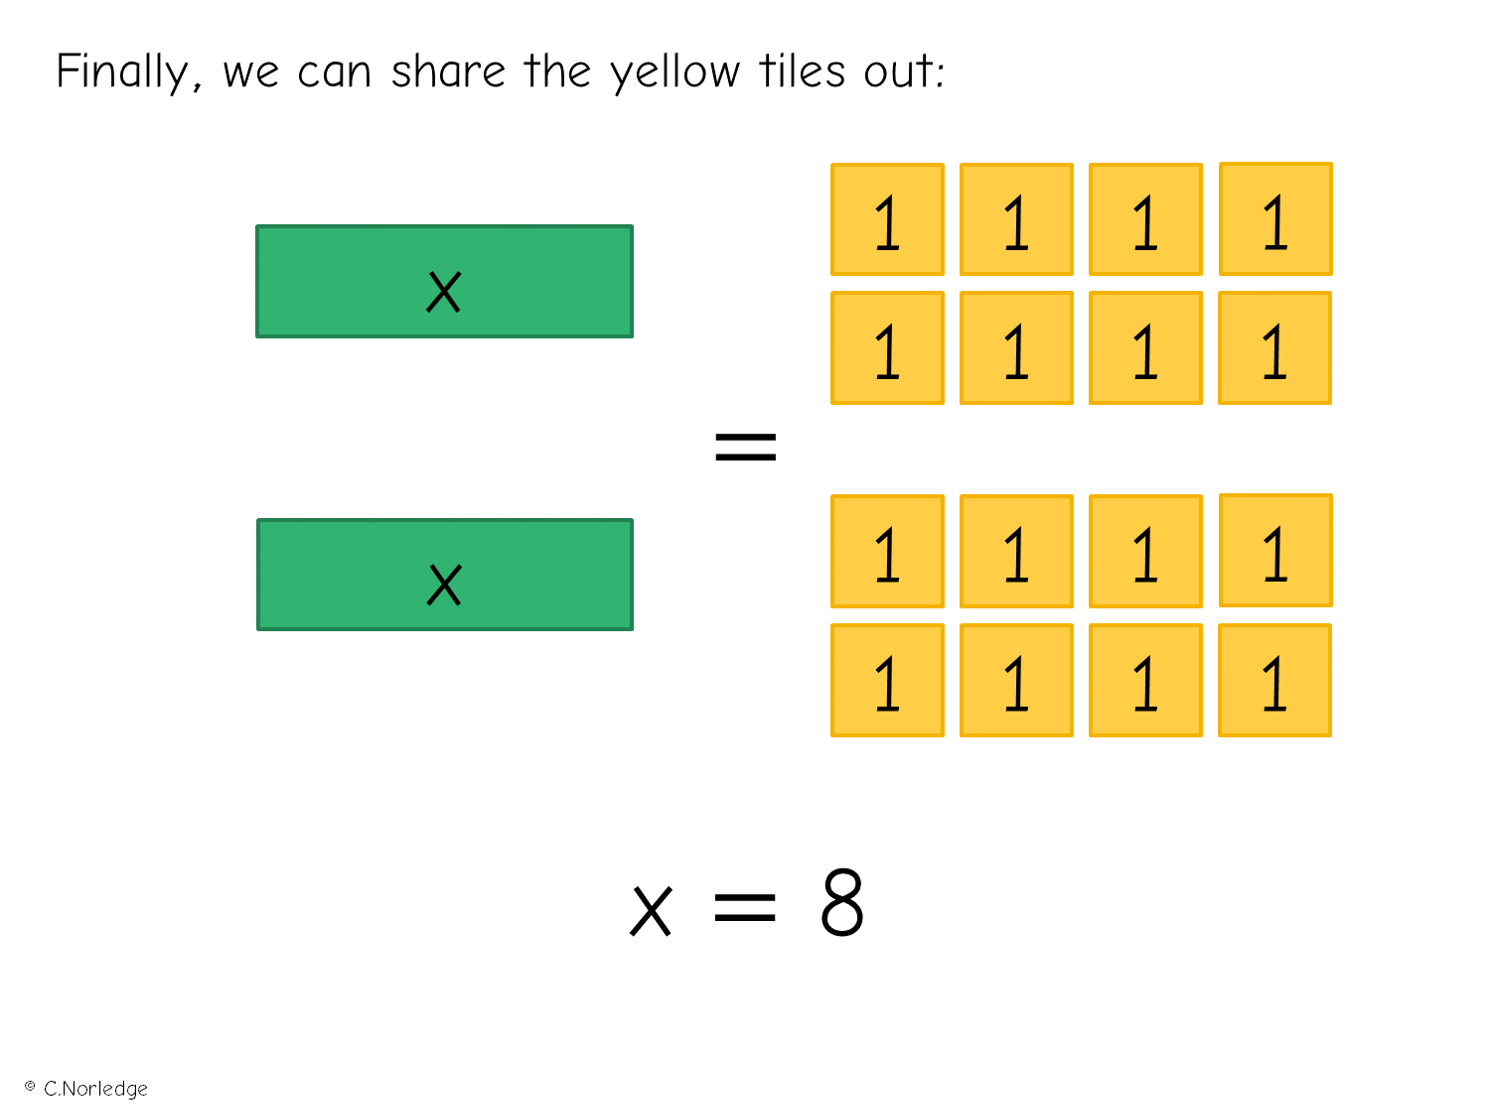
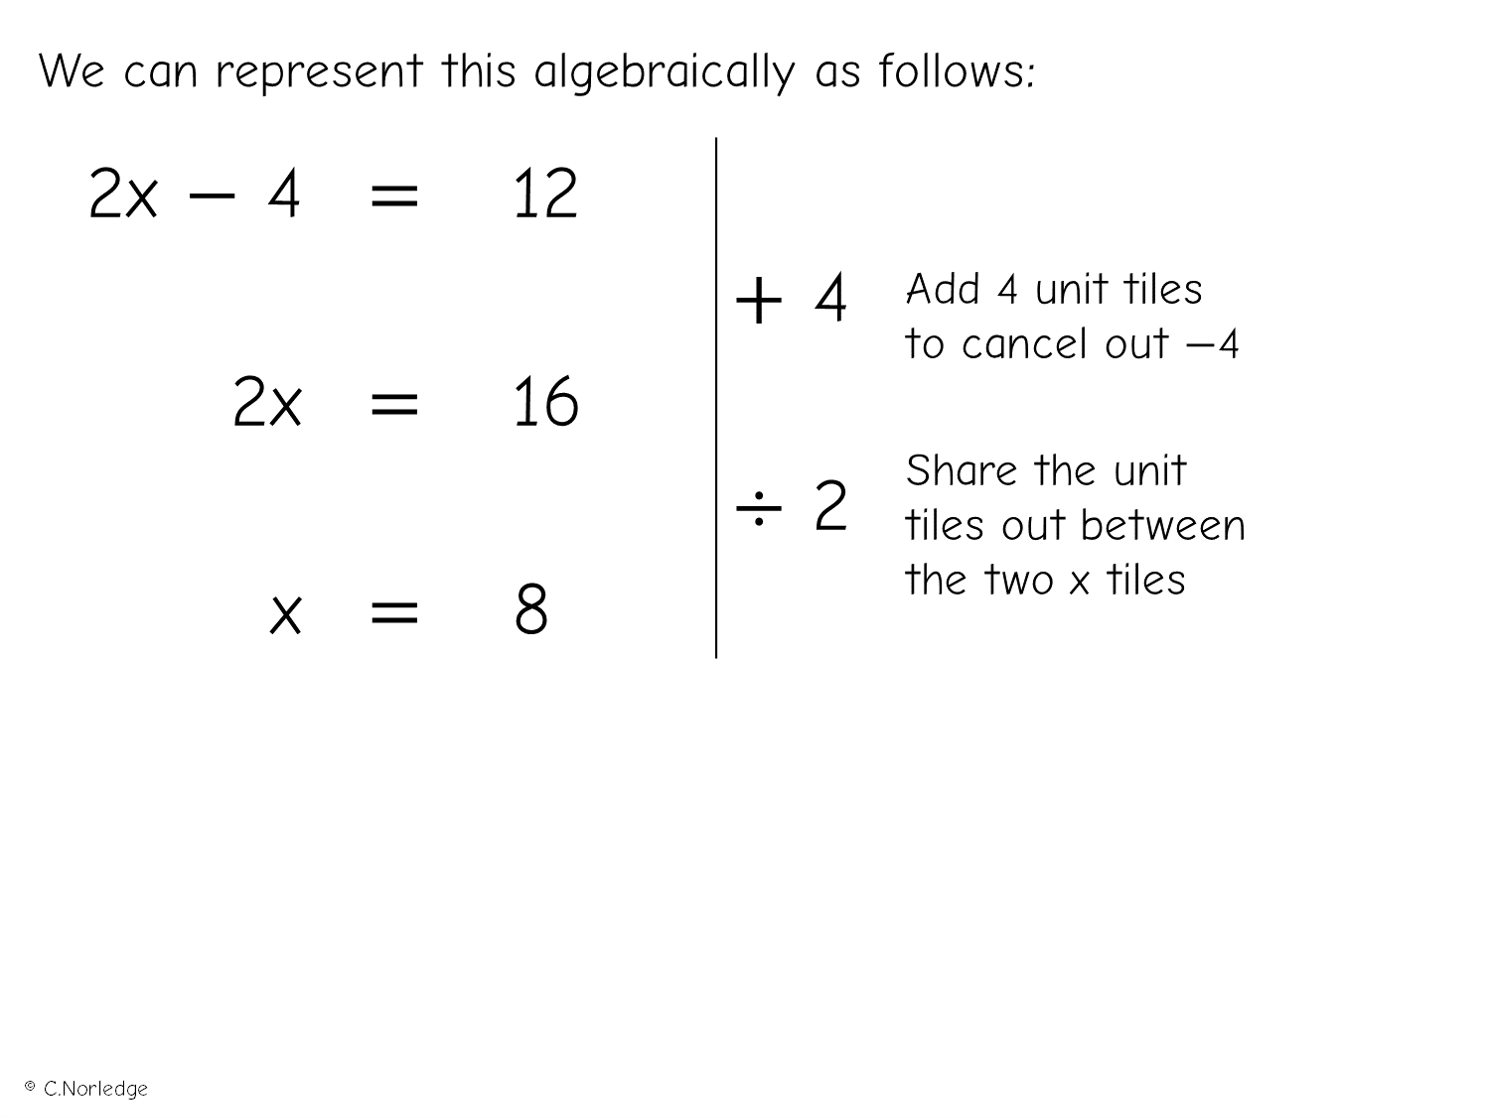
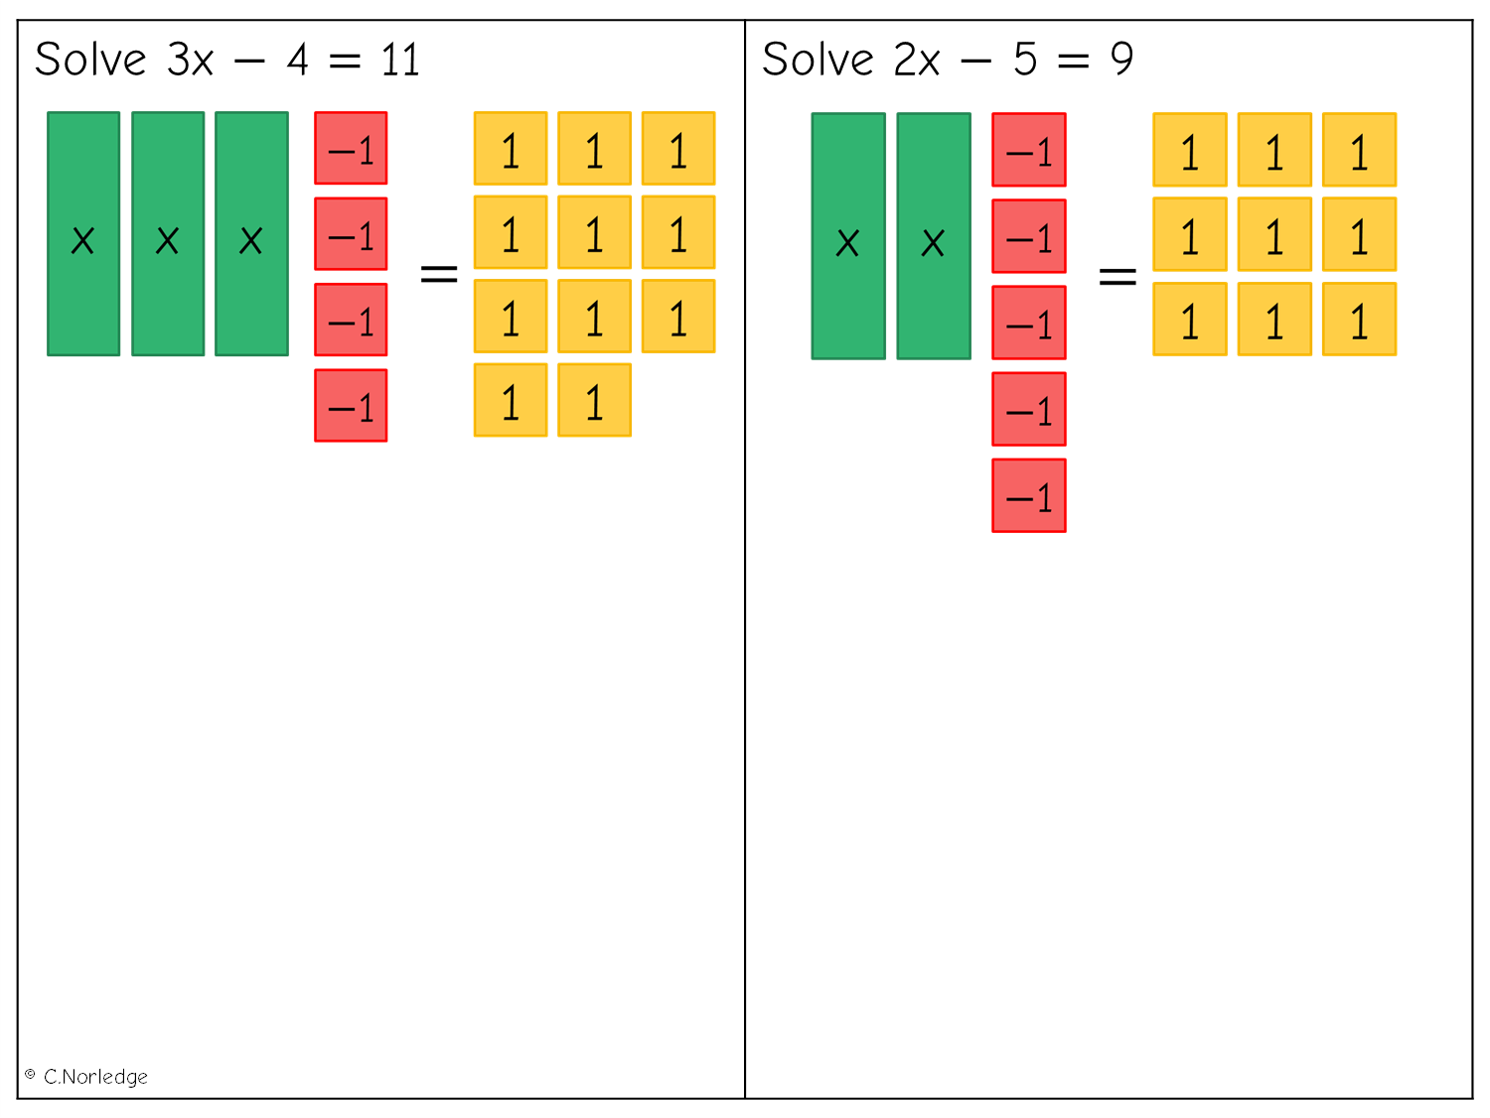
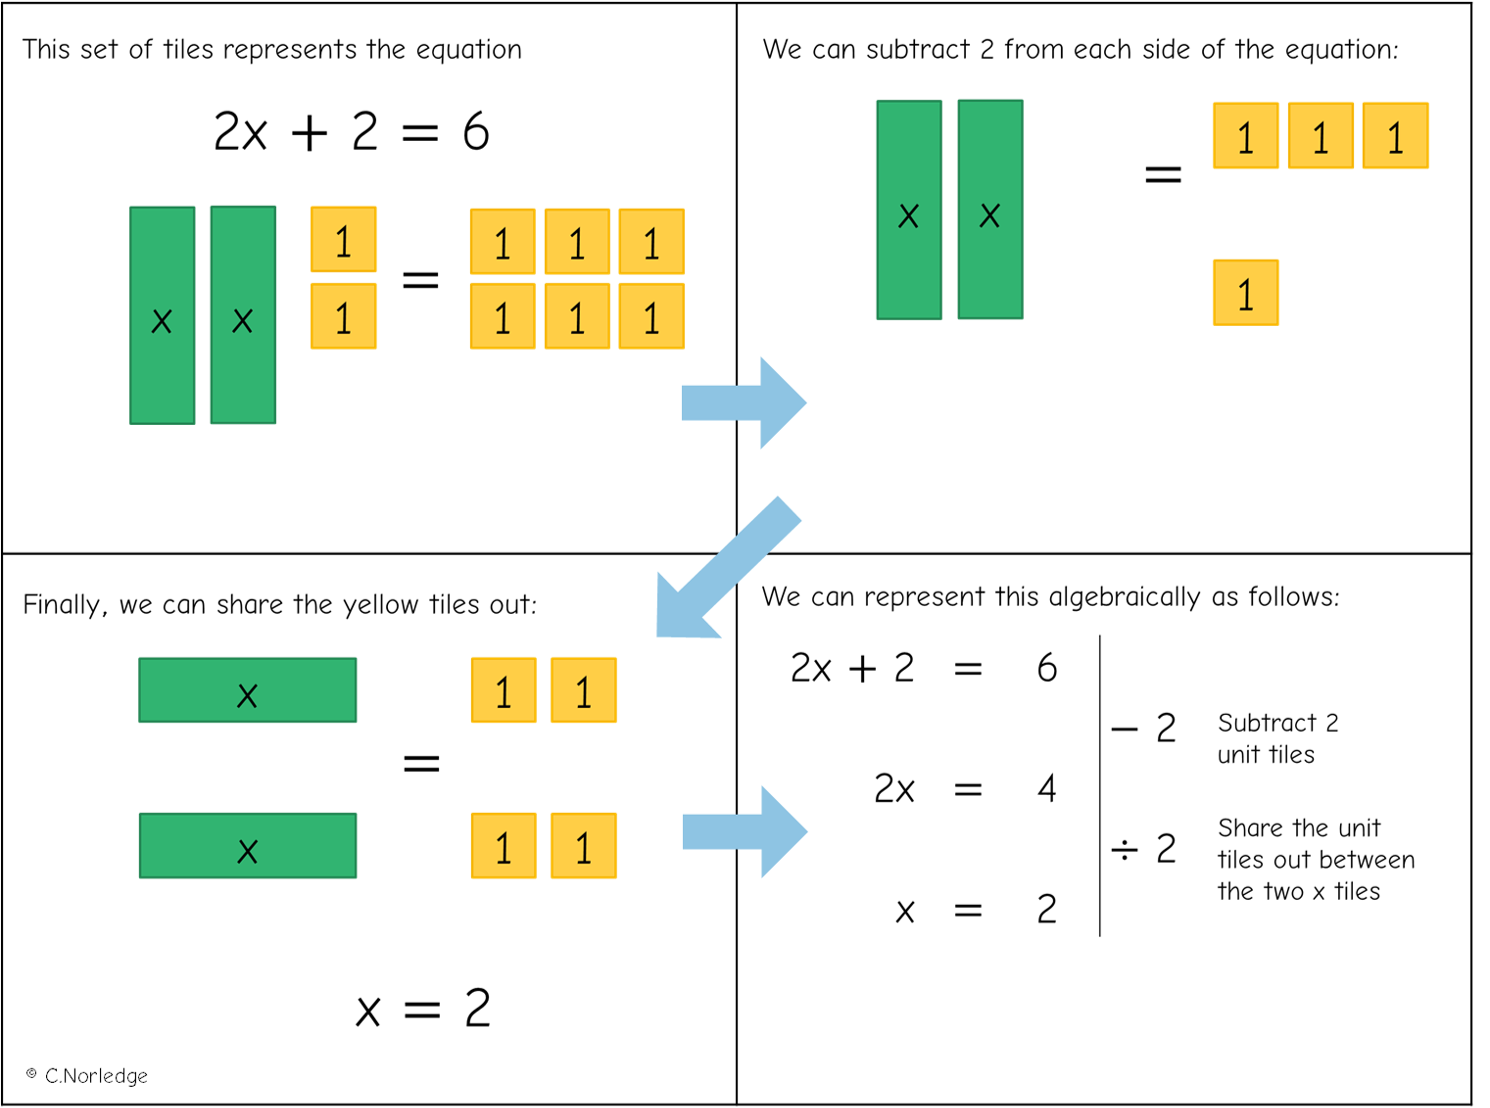
Expanding single brackets using algebra tiles
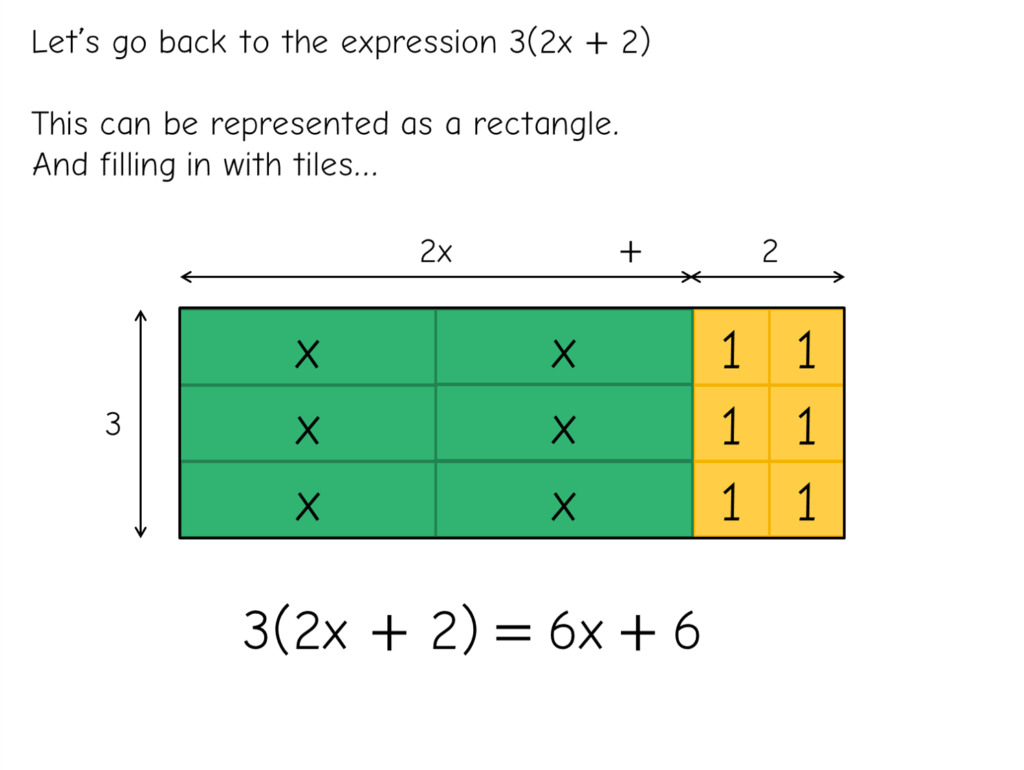
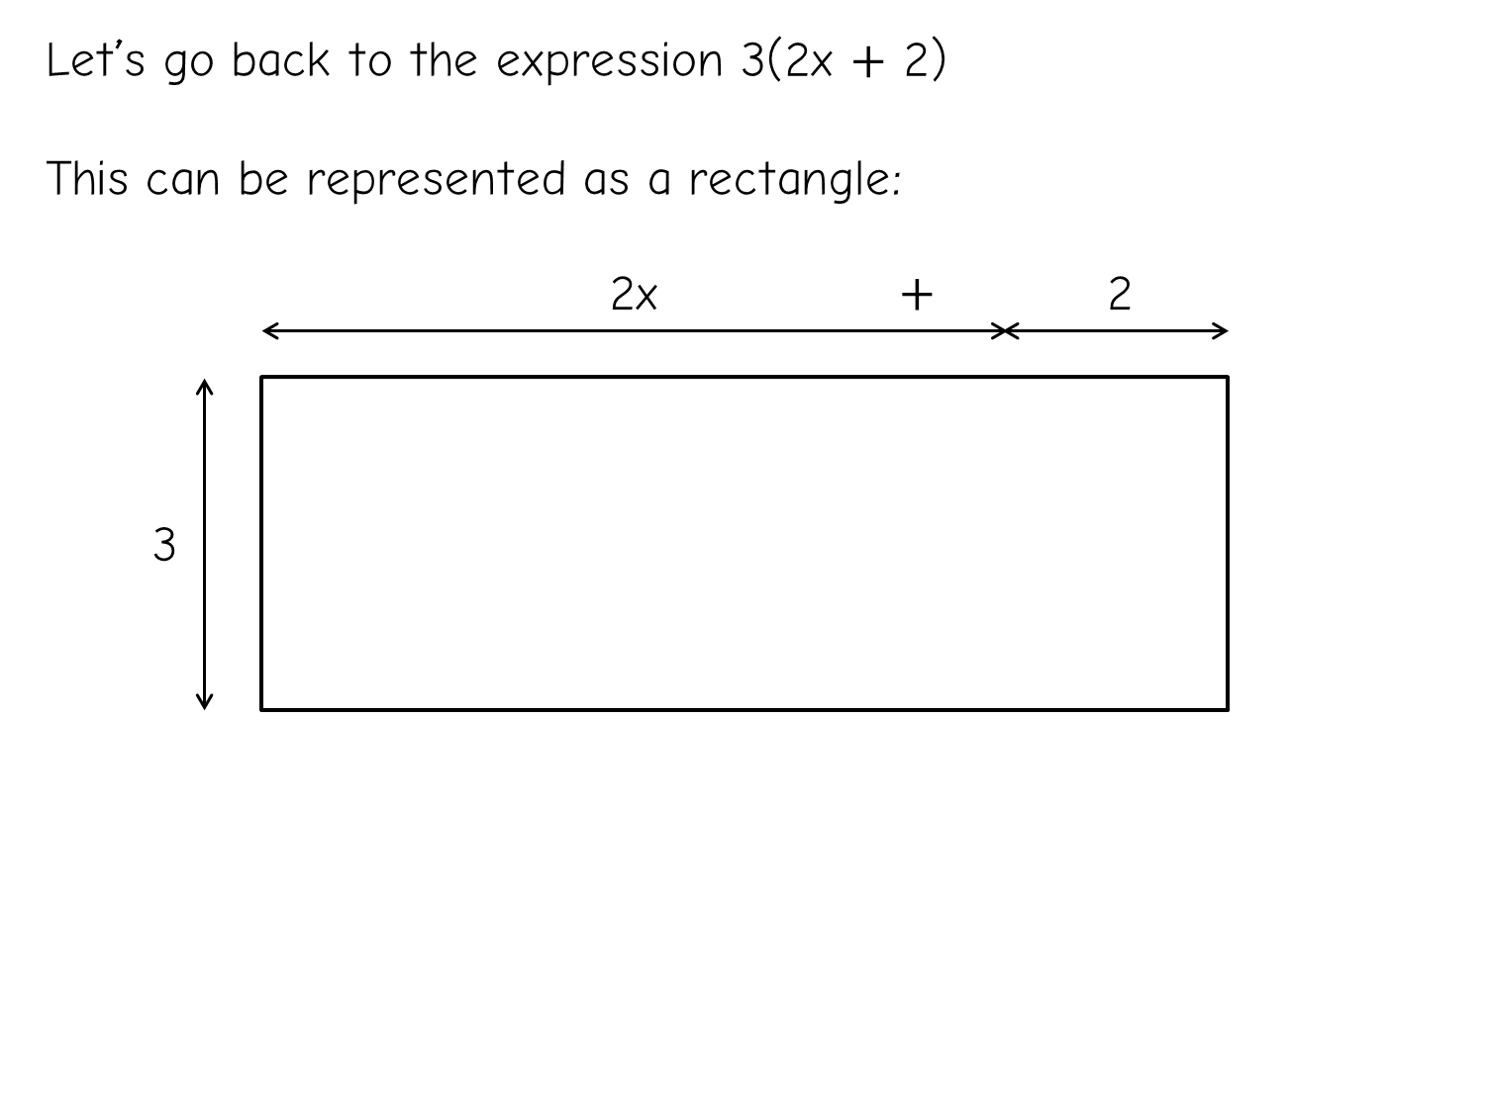
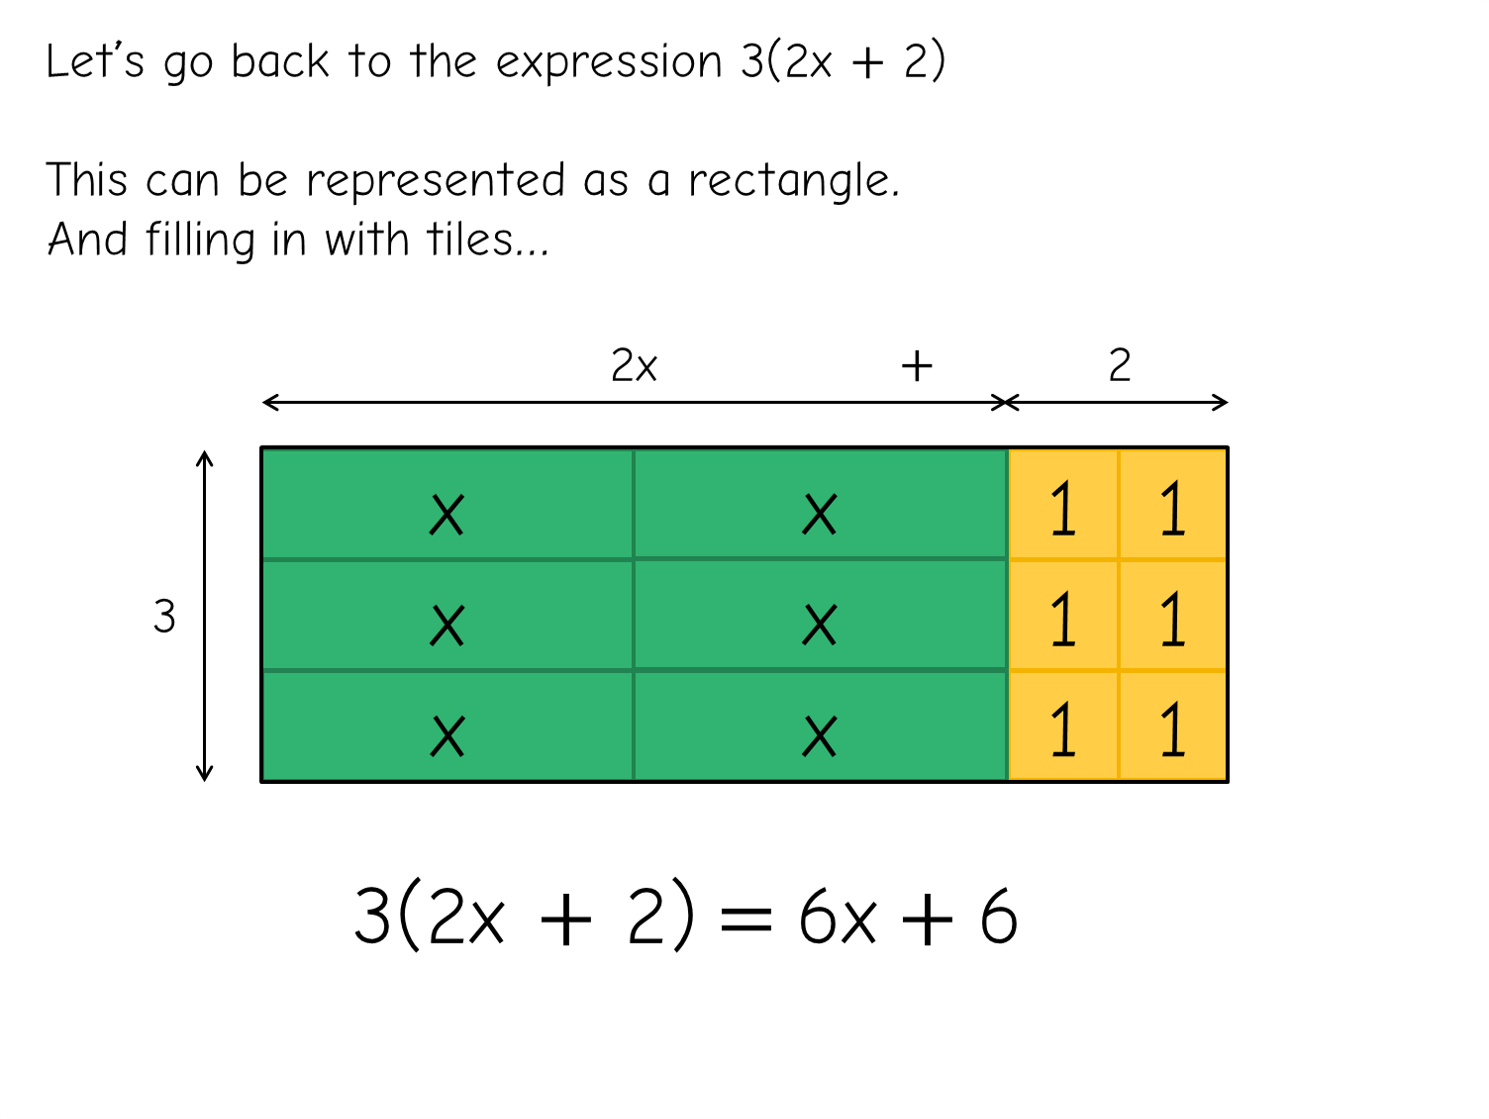
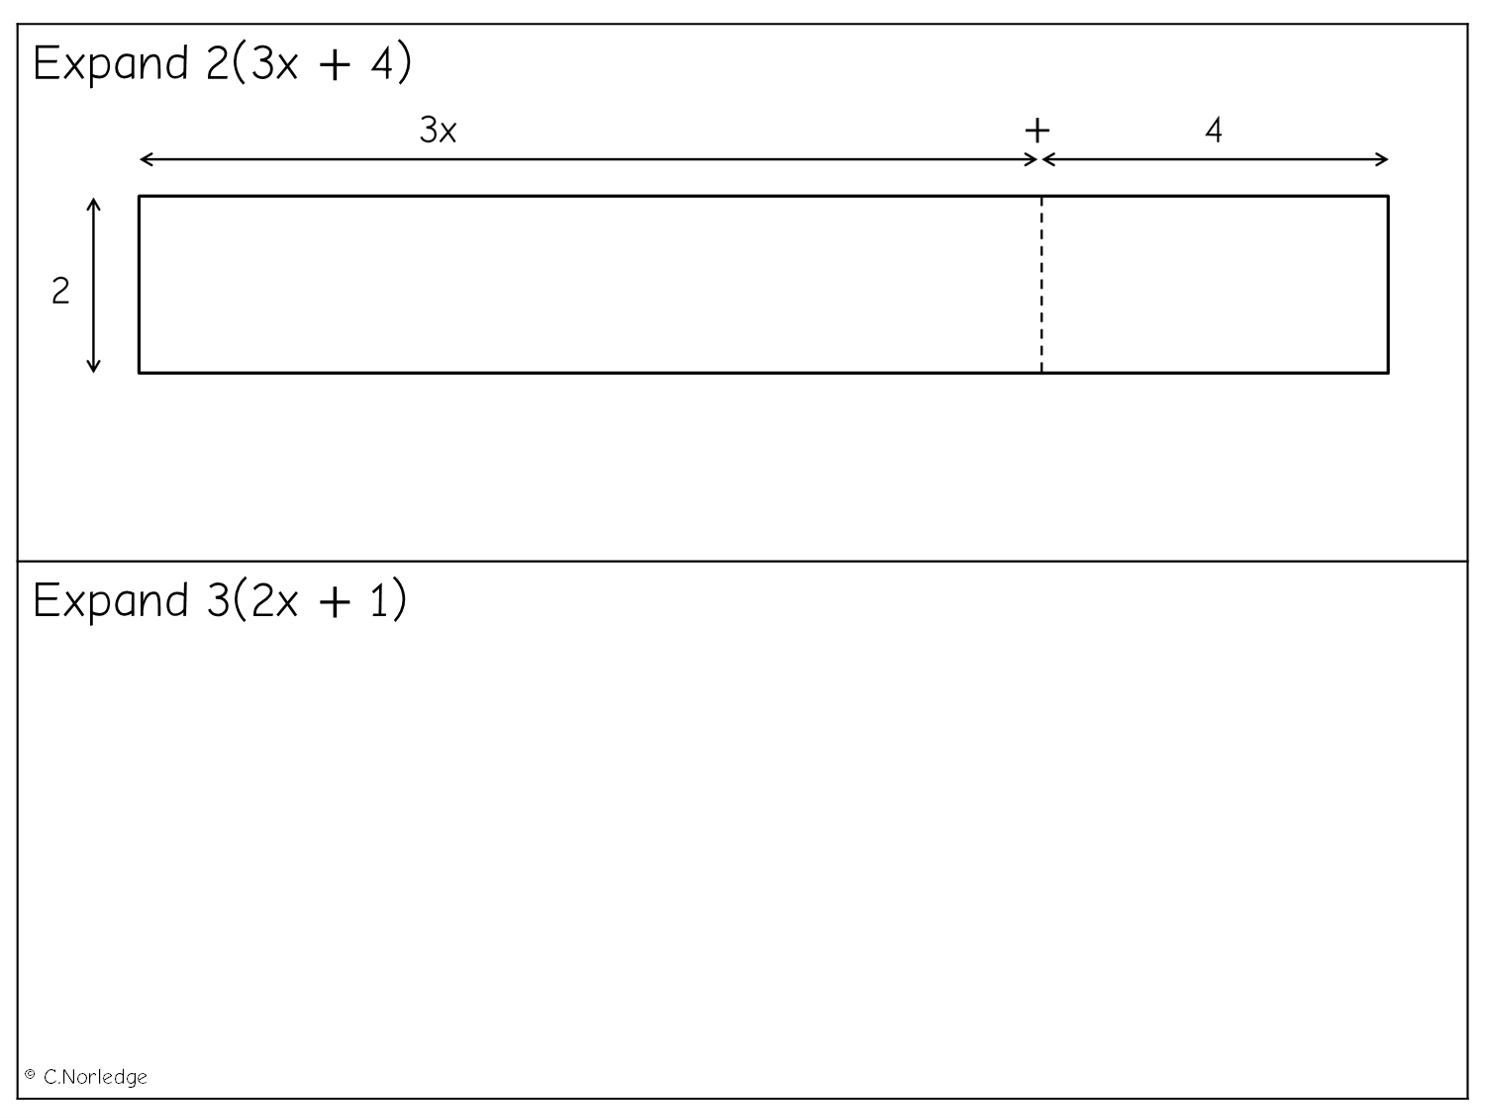
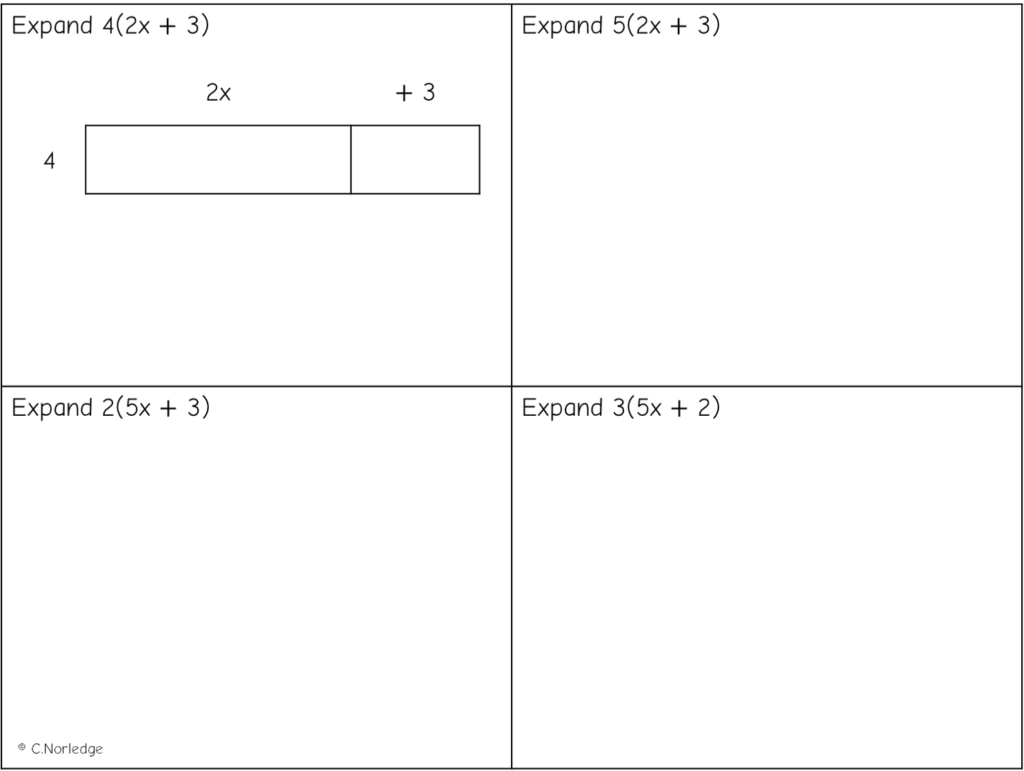
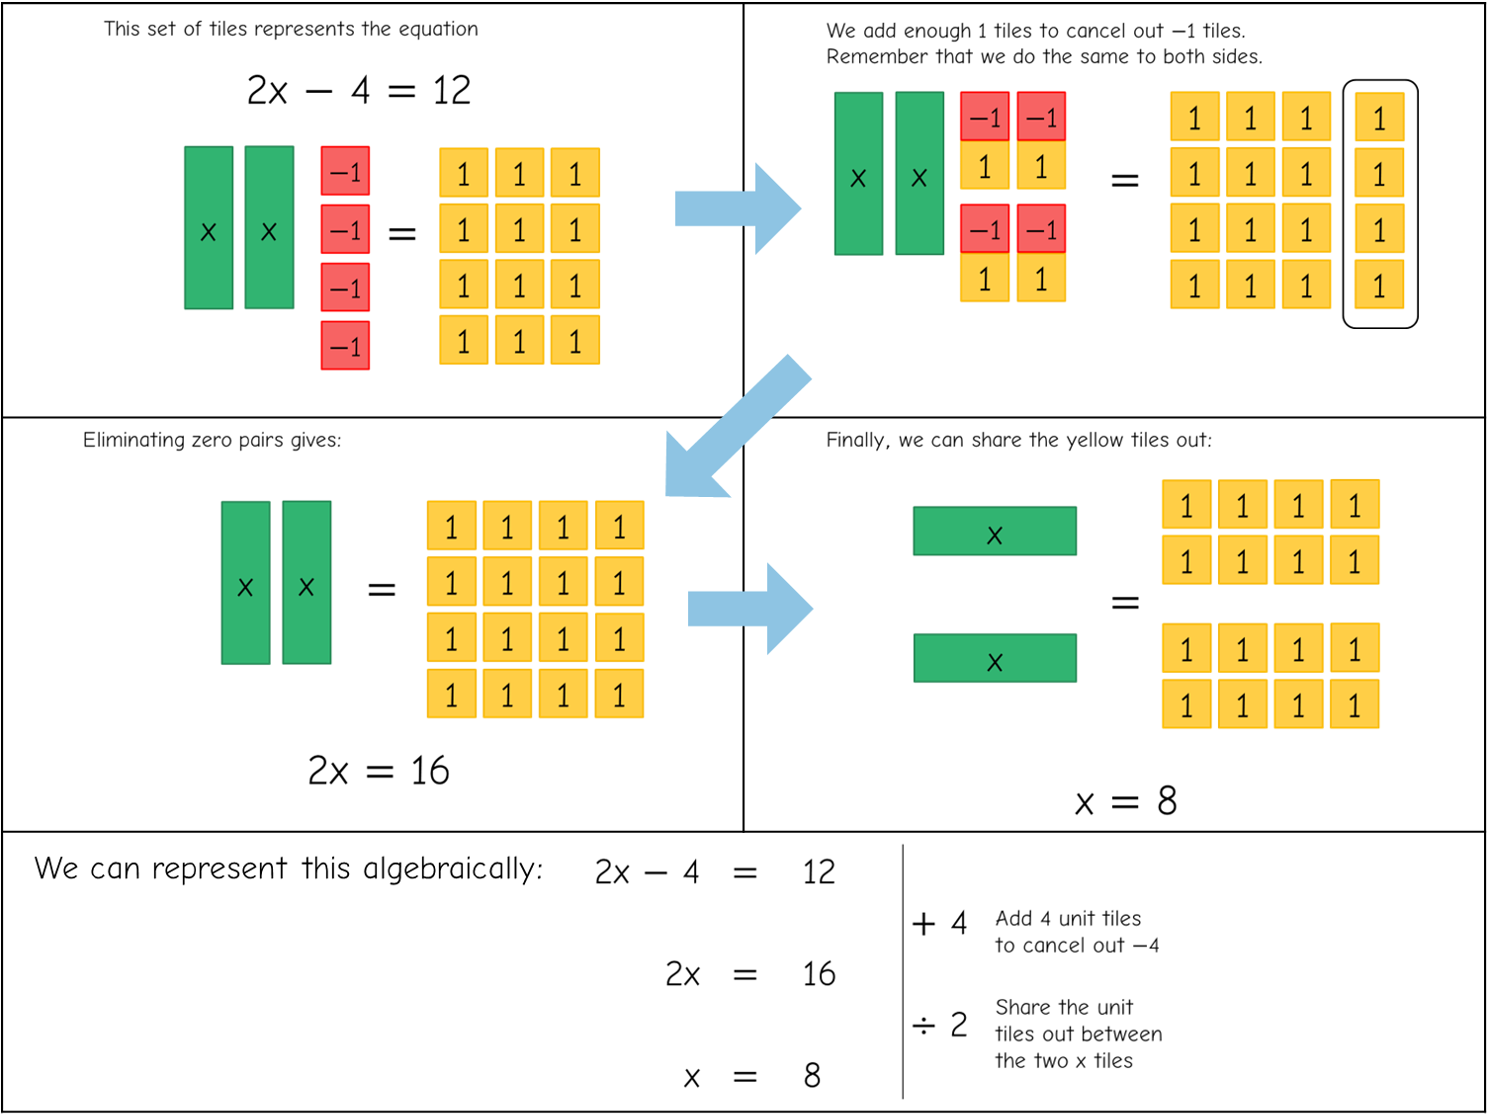
Expanding single brackets using algebra tiles Read More »
As per instruction, I am attempting to finish strong, and I had another really interesting lesson with Year 7 using the NRich Cuisenaire environment today, so I thought I’d go out in style with that.
Last Tuesday we did plenty of work with whole numbers and algebraic notation, and I was really keen to explore some fractions with them today; we completed a big unit of work on fractions before half term, but some of them didn’t do so well when I assessed them, so I need to keep coming back to this with them.
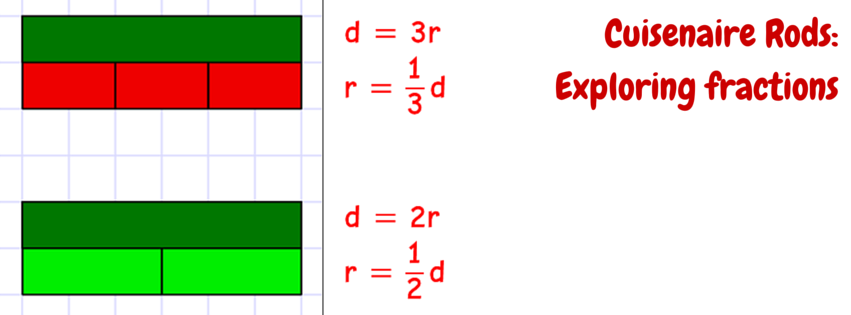
A key issue that we’ve been trying to work around is the meaning of the numbers in a fraction; we’ve reinforced this loads with bar modelling, but the Cuisenaire stuff links in so nicely that I decided we’d take the opportunity to attempt some fractional expressions.We started with a quick refresher, then we had a go at the first activity here, comparing one rod to another. We looked at links both ways, so wrote 6w = d first, then w = 1/6 d. It took a lot of annotating and re-explaining for them to completely get the idea, and I think I need some more problems along these lines to make sure they are really confident. The links to later work on solving equations and inverse operations are really clear though!
Next, we had a look at situations where the two Cuisenaire expressions weren’t the same length. I wanted them to focus on just comparing part to whole here, so we only really talked about y = 5/6d, but at some point we’ll go back and explore d = 6/5y further. This links so well to mixed numbers and improper fractions, as well as later work using proportional reasoning and scale factors.
We then had a go at the second task (scroll down on previous link), getting them to write statements to compare different sizes. I need to develop this further, because the level of difficulty ramped up too much for some of them. The couple who got it straight away were happy to continue to find their own expressions, and developed some quite complex ideas!
I’m definitely adding Cuisenaire rods and the NRich environment to my repertoire – the pupils are finding them really engaging and they’re a good stepping stone on the way through algebra tiles to abstract representation. Just got to keep tweaking these lessons and make some more resources now!
Fractions with Cuisenaire rods Read More »
So I had one of those lessons today that reminds me exactly how great this job can be. I snuck in an extra blog over half term about using Cuisenaire rods to introduce algebraic expressions with Year 7, and I guinea-pigged the lesson with them today – it worked so well, and I imagine would have been even better if we’d actually had sets of Cuisenaire rods rather than working on square paper.
We started by playing around with the Cuisenaire interactive from NRich – none of them had used the rods at primary, so I thought it was probably important that we got used to the basics. I started by building a couple of bonds to 10, then getting the pupils to explain what was there. They started by using numbers, referring to “the eight block” and “the two block”, but quickly started describing them as “brown” and “red”, and saying things like “brown plus red” quite naturally.I prompted them towards writing down “sentences” for the blocks we built together – so “brown + red = orange”. Once I’d written a couple out in full, someone suggested we just use initials, so this became t + r = o (brown is “tan” in Cuisenaire language – yeah, that threw me too).
I gave them some square paper and got them to build some more expressions equal to one orange (i.e. 10). They would have happily done this all lesson if I’d let them!


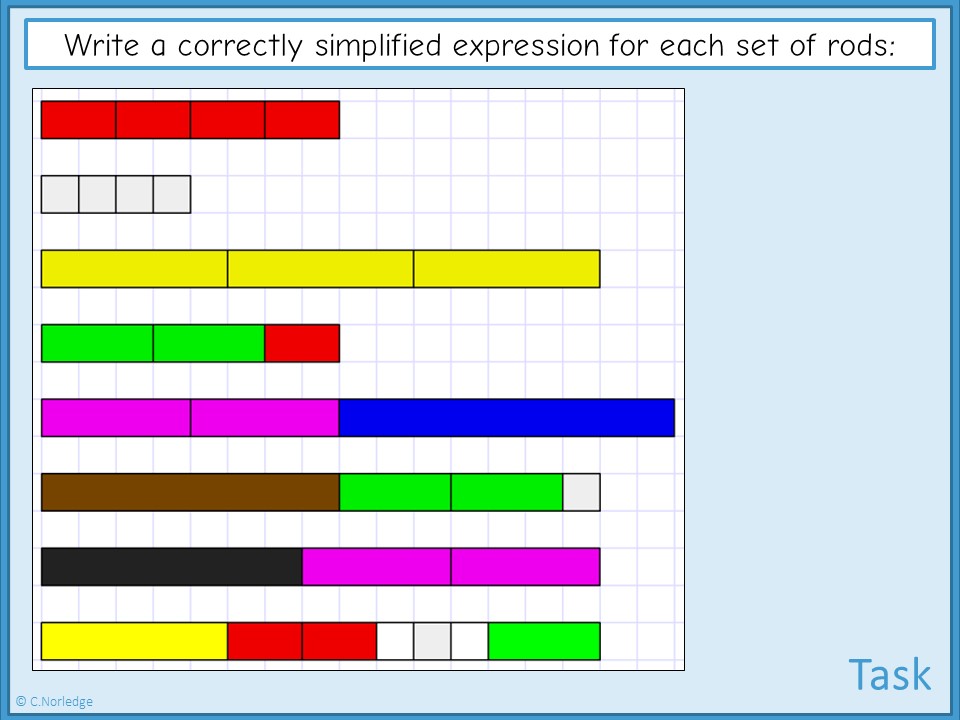
A few pupils had gone for 10 white blocks make one orange, but we had a big mixture of notation, including 10(w), 10 x w, w x 10 and just 10w. Interestingly, no-one wrote down any incorrect notation when simplifying (like writing w to the power 10, which normally happens if I do algebra without manipulatives). We quickly got to grips simplifying the rest of their expressions too.
Next up, we had a go at the task I’d written (here) – they found this really straightforward, but weirdly started introducing 1s in – so writing 2g + 1r instead of 2g + r. We had a quick chat about that.
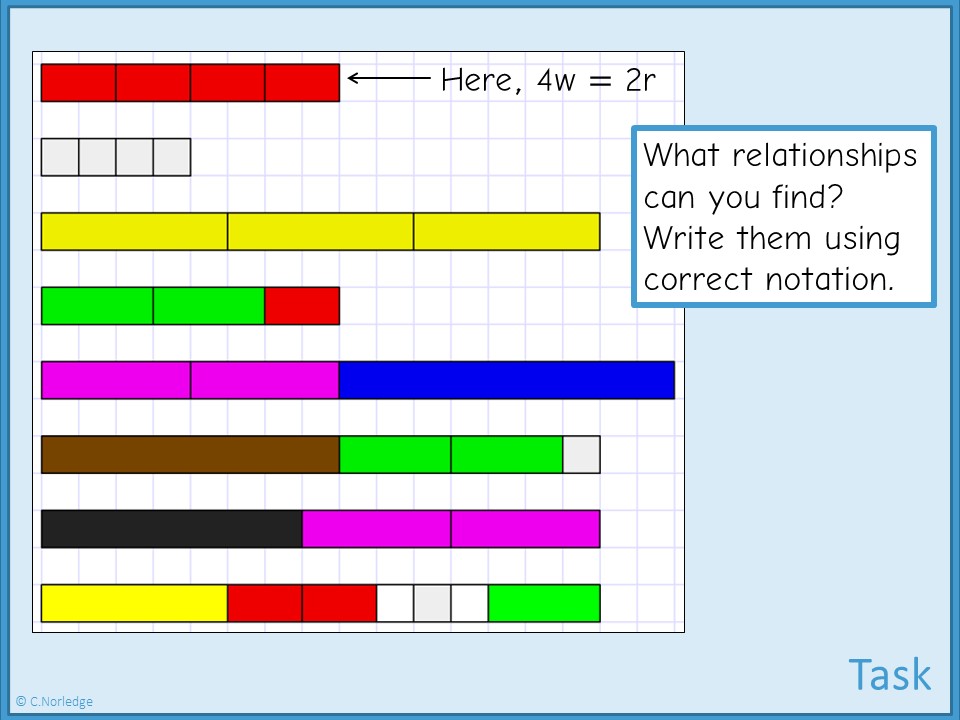
I wasn’t planning to do any work with equations, but as we had a spare ten minutes, I just asked them to spot any “relationships” – I didn’t use the word “equation”. They came up with loads:

A couple of really interesting things came up here. Firstly, the four-part equation (5th line down) seemed really natural to most of them, and they were comfortable with the fact that if A = B and B = C then A = C and so on. Secondly (and it’s boxed because we talked about it quite a lot), the last two equations came from the 1st and 4th rod pictures – there’s so much scope here for further work on equations!
(Header image: By Celcom, CC BY 3.0, commons.wikimedia.org/w/index….)
Cuisenaire rods and introducing algebra Read More »
I’ve spent quite a bit of time so far over half term working on the resource areas of my site – one topic I was keen to get a few more resources for was writing algebraic expressions and using correct algebraic notation, as I’m teaching this to Year 7 after half term and my collection was looking a little sparse.
Today I’d also found a link to the Cuisenaire Rods manipulative on the NRich site, which is absolutely fantastic. I remember discovering a dusty old box of rods in the resource cupboard during my NQT year, digging them out and then not really doing anything relevant with them because I didn’t have a) the time or b) the experience to work out how to use them without just confusing the pupils more. I’d always been determined to go back and check them out properly though, particularly with the links to the work I’ve been doing with algebra tiles. Obviously the first thing you can do with them is just use them to illustrate multiplication as repeated addition and get pupils to have a play around writing expressions for these:
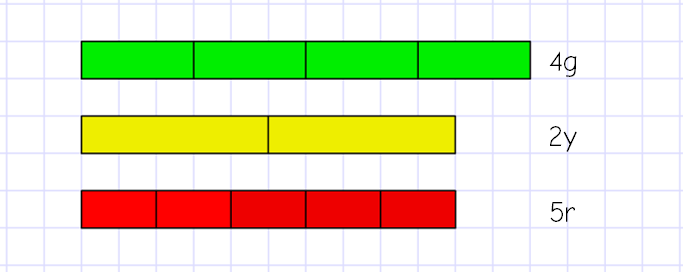
While making these examples, I realised how easy it is to accidentally create equations – from this picture, we have 2y = 5r and a visual link to y = 2½r. Similarly, there’s 2g = 3r, giving g = 1½r. Depending on how comfortable pupils are with fractions and inverse operations, you could delve even further into writing r in terms of y and g – but that’s a blog for another day, I think!
Stacking the blocks one under the other clearly links repeated addition, multiplication and area:
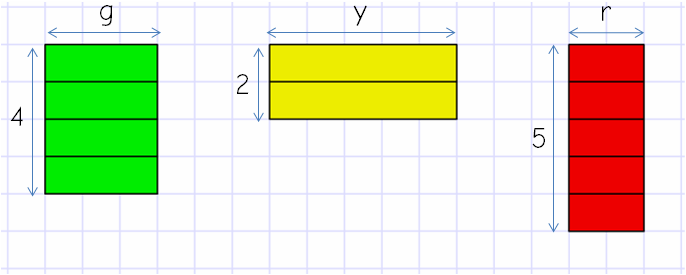
This can then develop easily to multi-rod (variable) expressions:
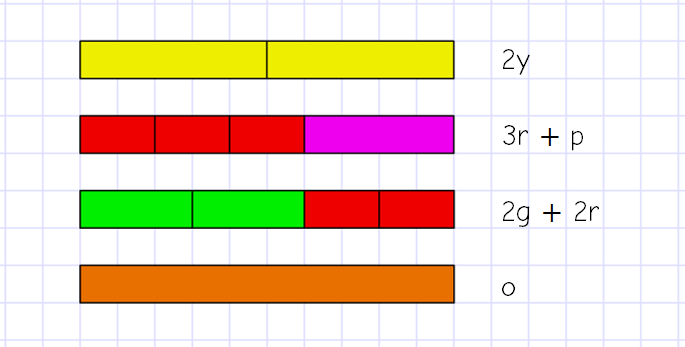
I’ve deliberately picked sets of rods that are 10 long, and I’d envisage that a further discussion about the equations we could make would happen in a classroom situation. Off the top of my head, you can spot 3r = 2g, p = 2r, 2y = o and then other relationships by picking fractions of one amount or another.
Unfortunately, without delving further into work on equations, you can’t really represent subtraction or division. Despite this, I think using the rods might be a great way into a topic that pupils find really difficult – I’d probably have a play with these for a couple of lessons before moving on to algebra tiles and introducing squares.
Also unfortunately, I am no longer at the school with the dusty box of Cuisenaire rods in the stock cupboard, and as far as I know we don’t have any kicking around anywhere at my current place, so I’ll be playing with the manipulative only. However, I am pretty tempted by this funky set of fridge magnets on Amazon…!
EDIT: I’ve now written a resource to test out when I get back to school; I’m probably going to leave the second slide to start with, as I don’t want to muddy the waters by teaching equations and expressions at the same time.
(Image credit: By Celcom, CC BY 3.0, https://commons.wikimedia.org/w/index.php?curid=9511548)
Cuisenaire rods for algebraic expressions Read More »
Year 9 and I have been working on algebraic expressions this week, and the lesson I taught yesterday was successful enough to deserve a “Lesson of the Week” post.
We did the Standards Unit card sort earlier in the week, which was far more successful than usual, possibly because I attempted to structure the activity far more than I have done before. After a starter on area of a rectangle, the pupils sorted out the diagram set first, copied these into their books and worked out the area using their own terms before then matching the words and algebraic expressions.
Yesterday, I’d photocopied this great resource from Tim Buckton and was planning to use it as a straightforward ten-minute cut and stick, but as I had a spare half-hour of PPA before the lesson, I decided to plan and try something a bit different.
I’d not used algebra tiles with this group before, so I decided that this was an opportune moment to introduce them (you can read more about my love of algebra tiles here). I’ve found that some pupils can be quite resistant to using manipulatives at KS4, so I’m trying to get the tiles in early so my class are used to them to support all our work on algebra.
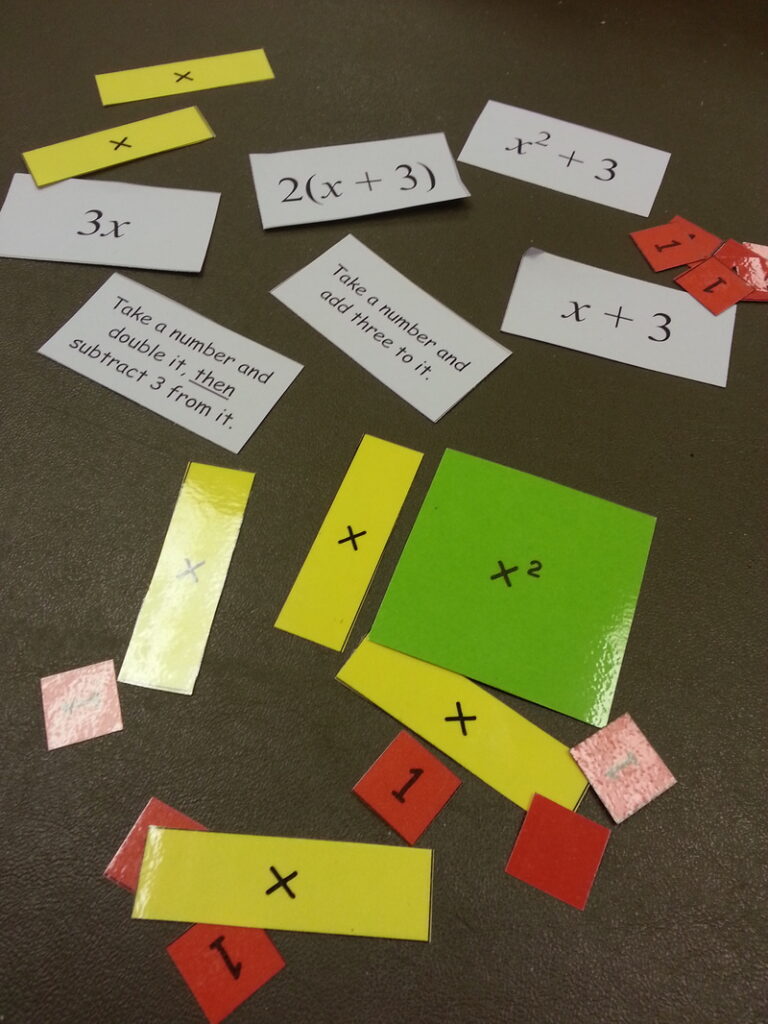
I started the lesson with a quick introduction / explanation of the tiles, with a couple of example diagrams. In order to emphasise the area links (and for later work on factorising), I demonstrated making a tile arrangement into the “best” rectangle I could.

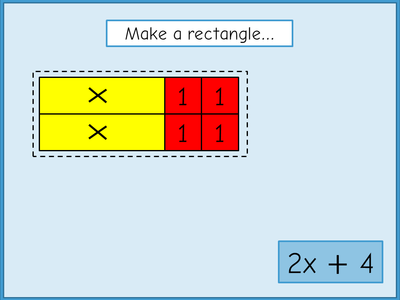

After we’d done this bit, I gave each pupil a pack of tiles and the card sort, spacing them out one per desk so they didn’t get all their cut-out bits and diagrams mixed up with their partner’s.
The activity worked really well in terms of engagement for most, and I had lots of discussions with individual pupils revealing and quashing lots of common misconceptions.

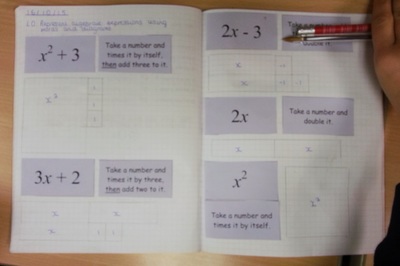
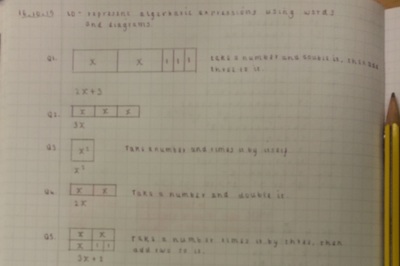
We addressed:
I’m planning to explore the area idea in a little more depth next week.

LOTW – Expressions using algebra tiles Read More »
The teaching methods I use for solving equations have changed drastically over my (relatively short) career so far, so here’s a post about my journey so far and current “tried and tested” ideas.
1. Why animal algebra doesn’t work
One very clear memory I have of my time at school is the first term of work I did in Year 7. My teacher was properly “old-school” – he’d demonstrate for 15 minutes, then we’d work in silence for the remaining 45 minutes on similar problems. He was the deputy head, and we were all pretty terrified of him; while I don’t want to debate if that’s a good teaching model or not, one thing that really stuck with me was that first term’s work – we did nothing but solving equations, pretty much from September until Christmas. It wasn’t just simple linear though; we went all the way to solving quadratics using the formula, although I confess I didn’t really know what I was doing or why I was doing it. As a result, I’ve always loved algebra and been pretty good at it (conversely, my geometrical reasoning skills are pretty dire).
He taught us equations by drawing see-saws with cats, dogs, elephants and frogs perched on one side, and numbers on the other. Gradually the animals disappeared to be replaced by letters, until we were solving some pretty complicated equations, including unknowns both sides, negative and fractional answers and coefficients.
Because it stuck with me so much, I tried it when I started teaching. Didn’t work in the slightest; here’s a prime example of having to find your own ways of explaining things – what worked for a group of top set kids in a pretty high-attaining middle school in Staffordshire just didn’t seem to translate to my teaching with kids who had never understood algebra in the slightest and were just bemused by the pictures of animals appearing everywhere. I realised that, although this method had clicked with me, it was clouding the issue for many of my pupils, and I stopped trying to teach animal algebra soon after that.2. Clarity of notation
During the second week of my NQT year, we had a department Ofsted – as I discovered later, the lady who observed me was Jane Jones, their mathematics leader, and our school was one of those used to compile their “Mathematics: Made to Measure” report published in 2012. As I was absolutely petrified at the thought of big ol’ scary Ofsted turning up when I’d not even got settled in, I was pleased that my lesson went OK. However, in my feedback, Jane mentioned one thing that I’d not even thought about before – the way that my presentation was confusing some of the pupils:
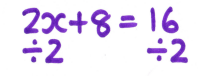

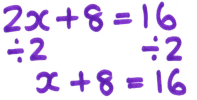
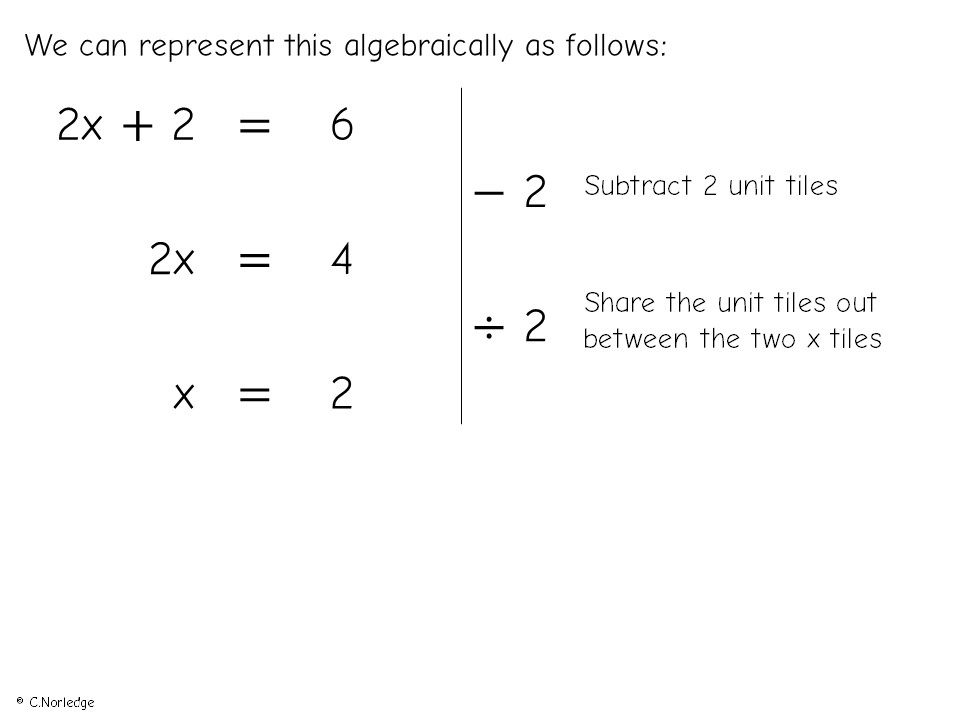
At this stage, I was in the habit of writing the inverse operation below the equation before doing the next line of working.
Although this worked fine for most pupils, some were getting confused about exactly what the “divide by 2” referred to, and were simply dividing the x coefficient by 2, rather than the whole of the left-hand side of the equation.
Some were also mixing up their working with the equation, ending up with lines of working and solution blending into each other and creating even more confusion.
During my second year of teaching, I discovered an A Level pupil solving equations like this:
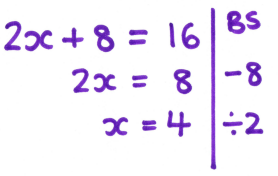
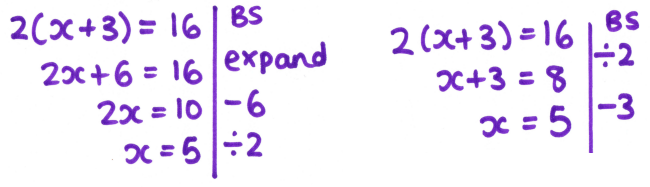
She consistently used this presentation in her working; she explained that she wrote down how she was transforming both sides of the equation on the right-hand side of the line, with her solution on the left-hand side.
I went away and trialled this with my Year 10s; they loved it as a method for organising their working, so I now present all my algebraic working like this.
One major benefit of this is how well it translates to other branches of algebra; I get pupils to include “expand”, “factorise” or “square root” in their right-hand columns when creating examples for revision to remind them exactly what they did to get the solution. It also links in really well to work on inverse functions, as it creates a flow-chart of operations which can easily be followed backwards.
3. Conceptual understanding and modelling
Once I’d got my notation sorted, I started thinking more critically about the conceptual issues pupils were having with solving equations. My teaching at this point was still mostly procedural; do one example, then get the pupils to practise loads more. I think there’s still an argument for doing this, as fluidity in solving equations is so important for higher-level topics, but I think I was teaching the process and hoping that understanding would miraculously appear later (it didn’t).
Following on from my experience on the NCETM course last year, I started to try and incorporate more ideas about modelling situations into work across the board. I also took a different approach to the whole topic; before even going near solving equations, I got pupils to build their own. I used Fred and George (yes, the Harry Potter twins – they pop up a lot in my random examples), who have to have equal money spent on them for presents, and got pupils to model this, using p as the cost of a present.


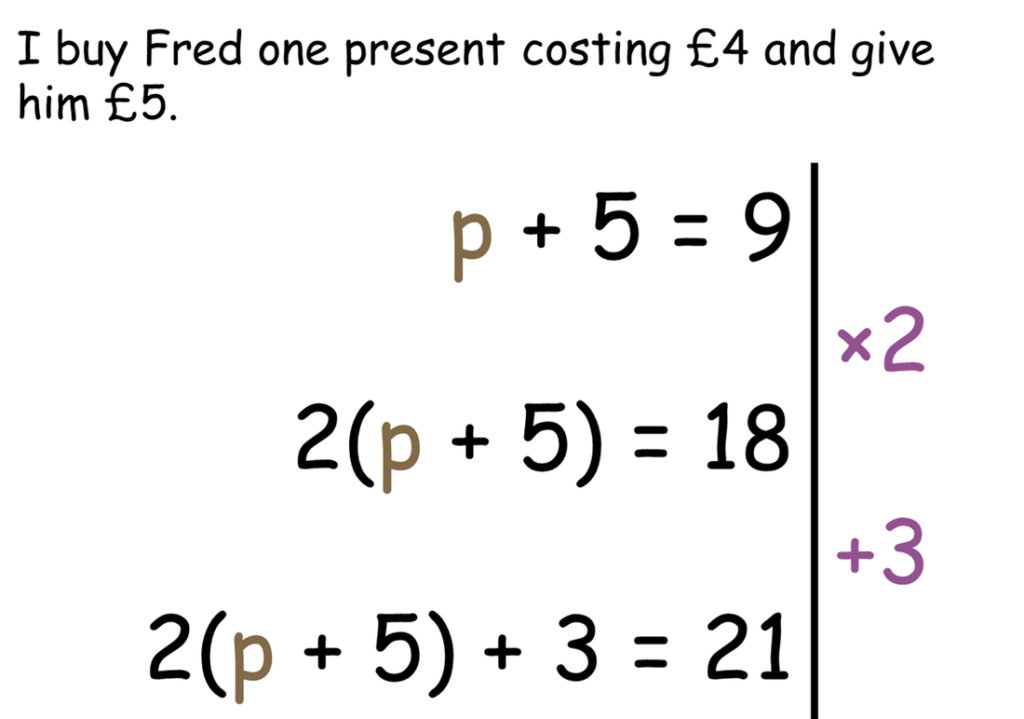
We spent a couple of lessons creating our own equations before even thinking about solving them, and I started to encourage the line notation for pupils to show their working out.
This seemed to work quite well as a conceptual model for them, and was infinitely preferable to using animal algebra, as a present can cost an amount of money, whereas having “a cat is worth 5” is a little meaningless.
By the time we’d finished making up equations, I’d found and started using algebra tiles with my Year 11s to complete the square. I decided to give this a go for linear equations as a way to move from the concrete idea of “a present” towards the more abstract “value of x”.
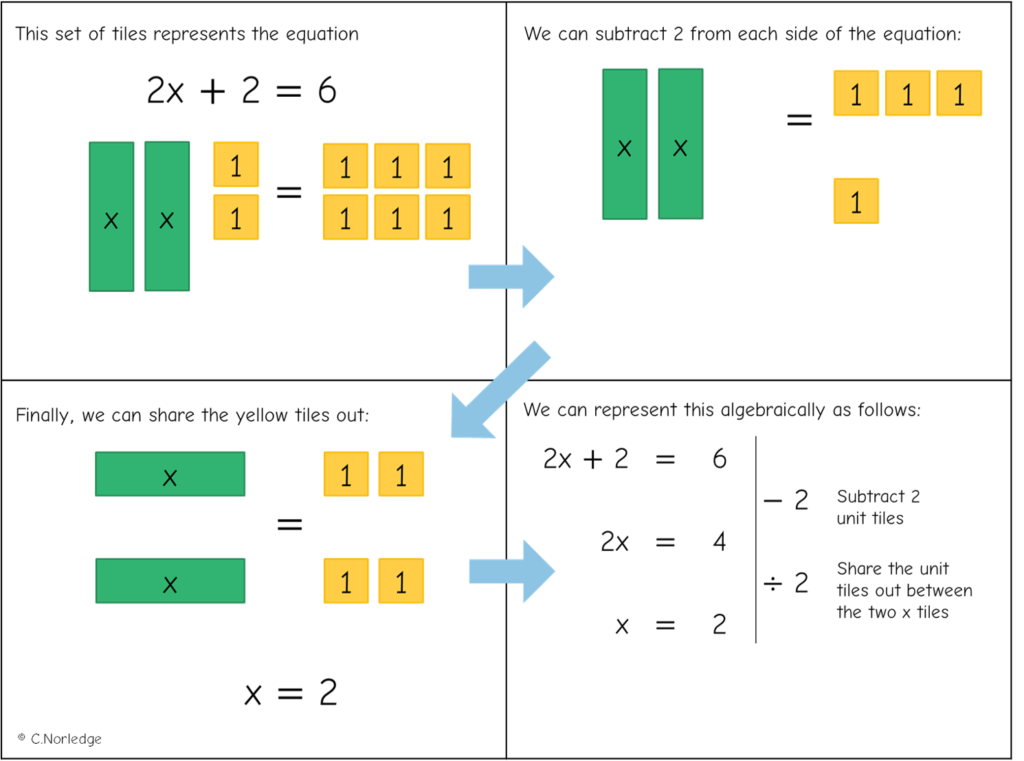
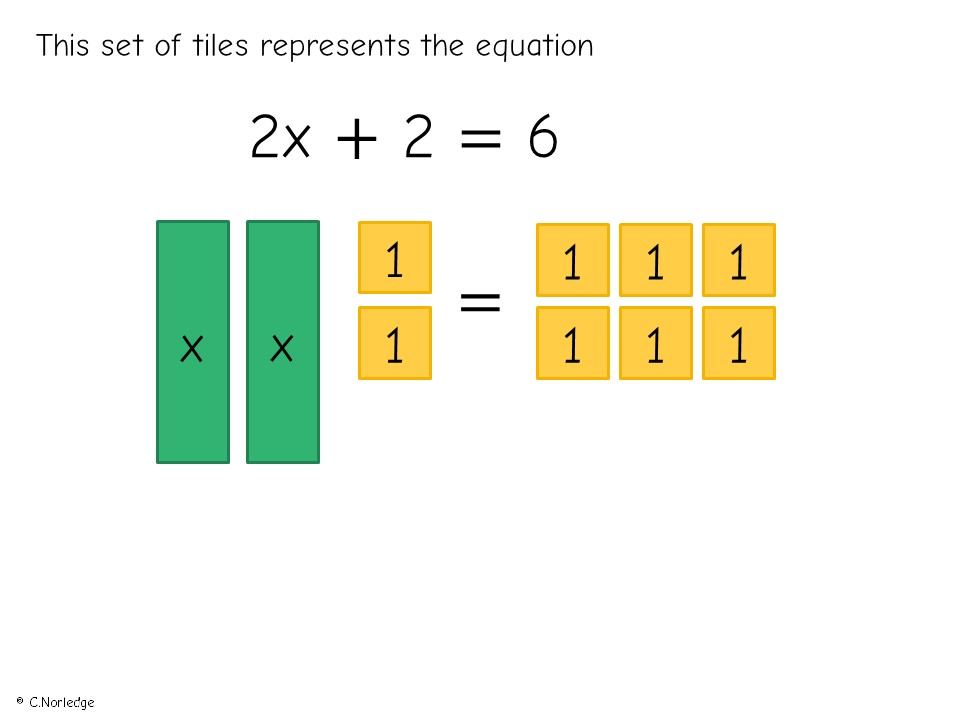
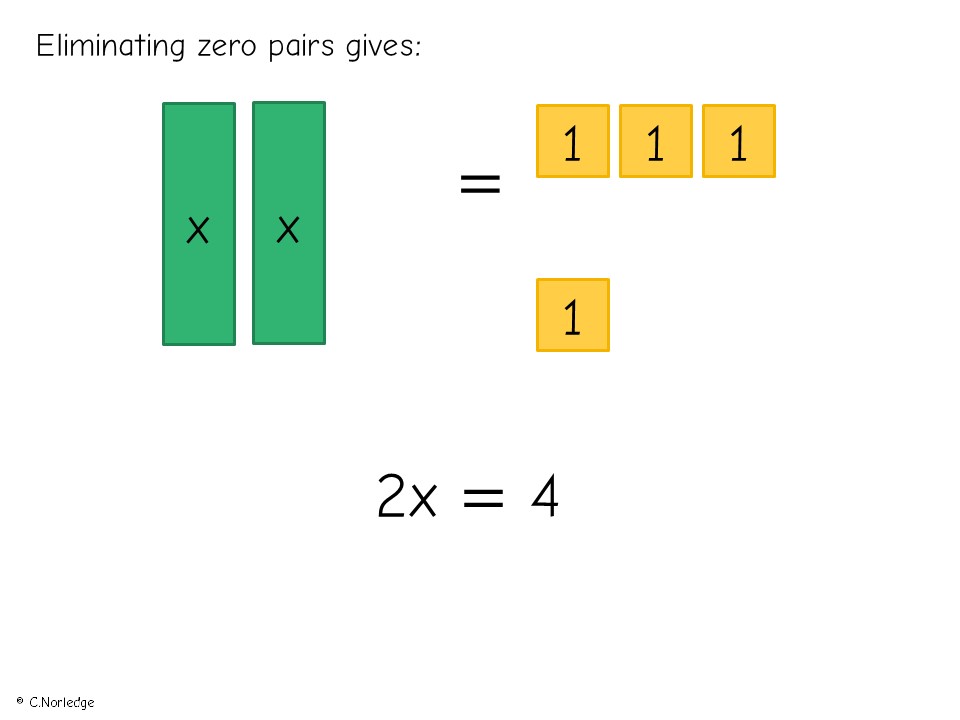
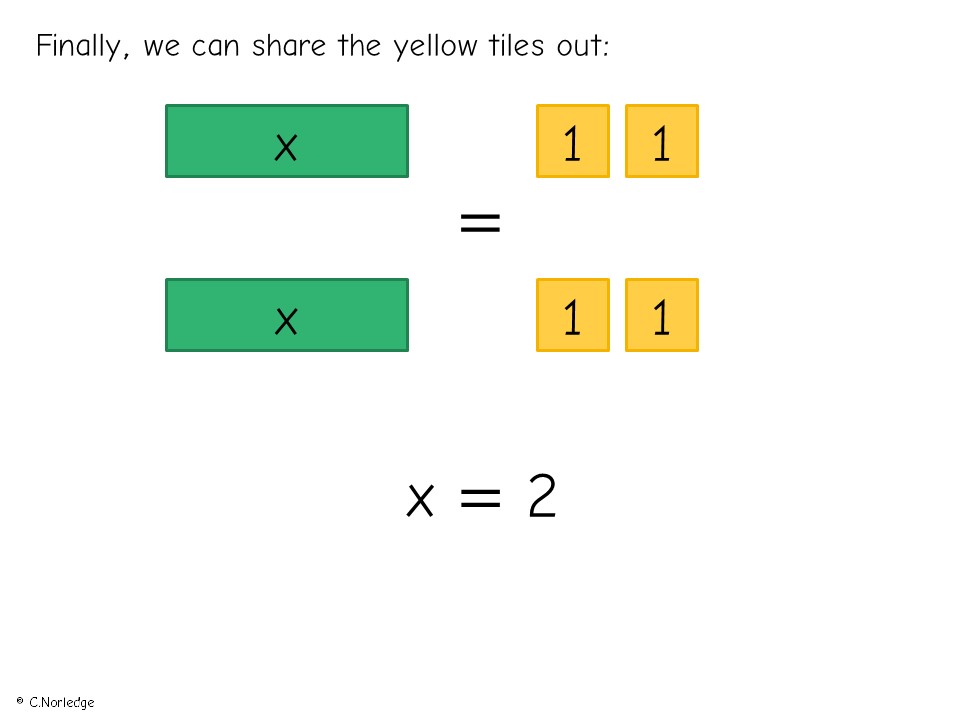
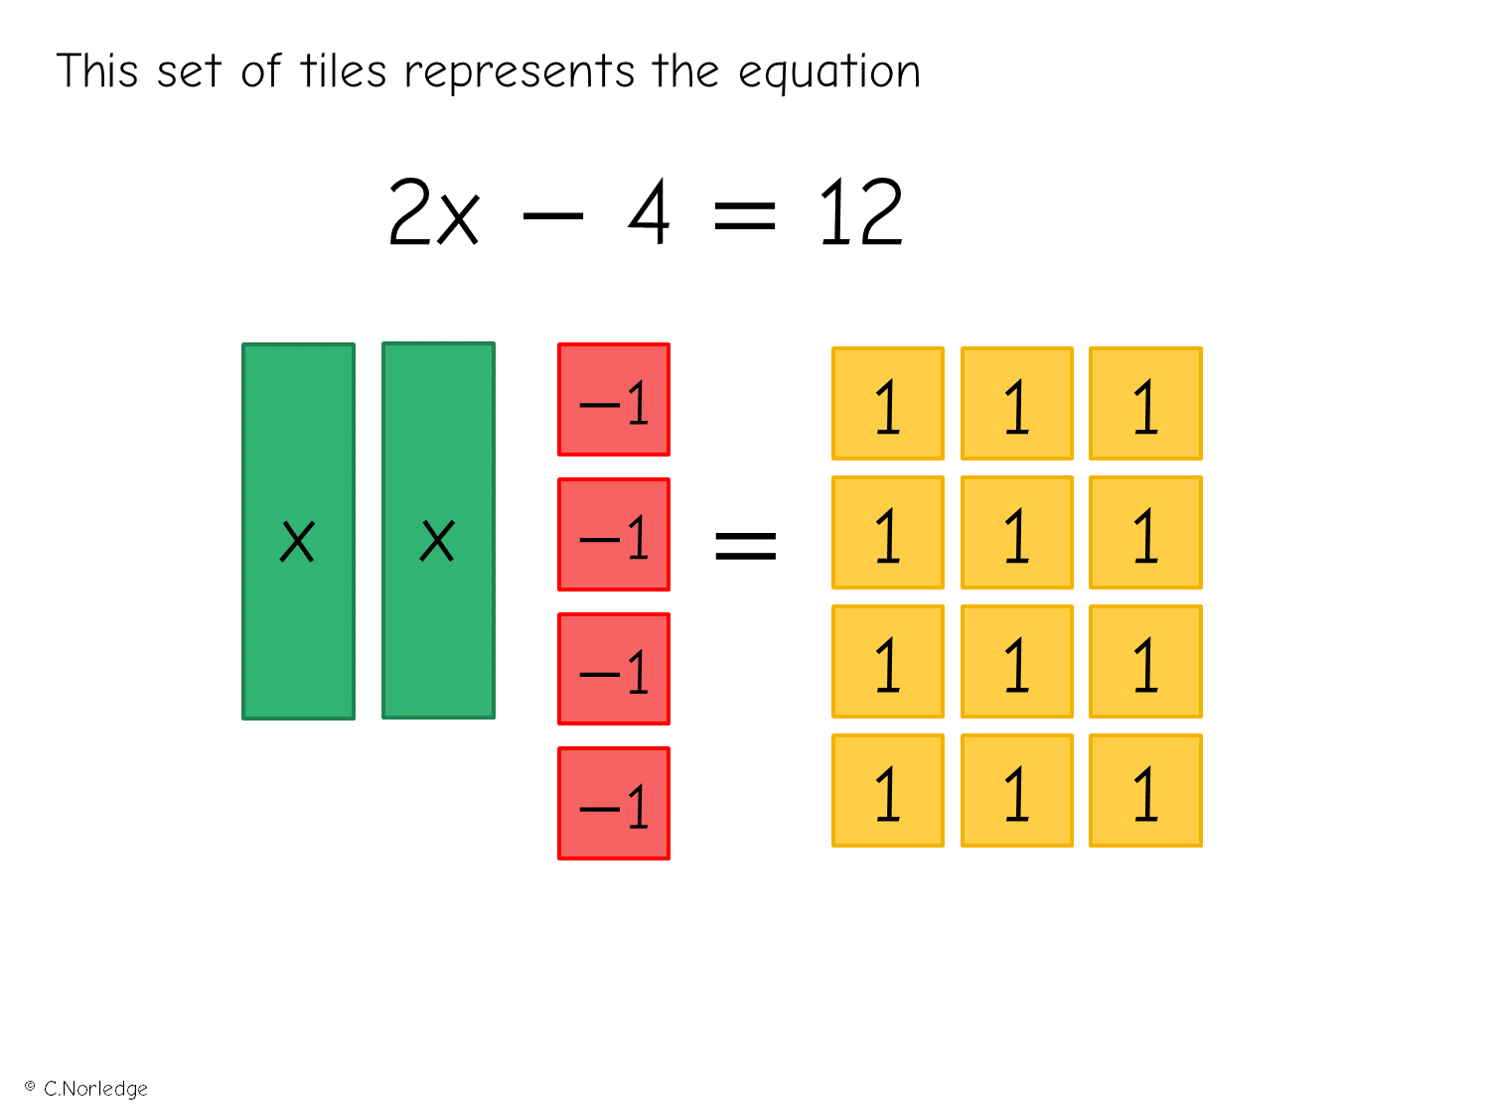
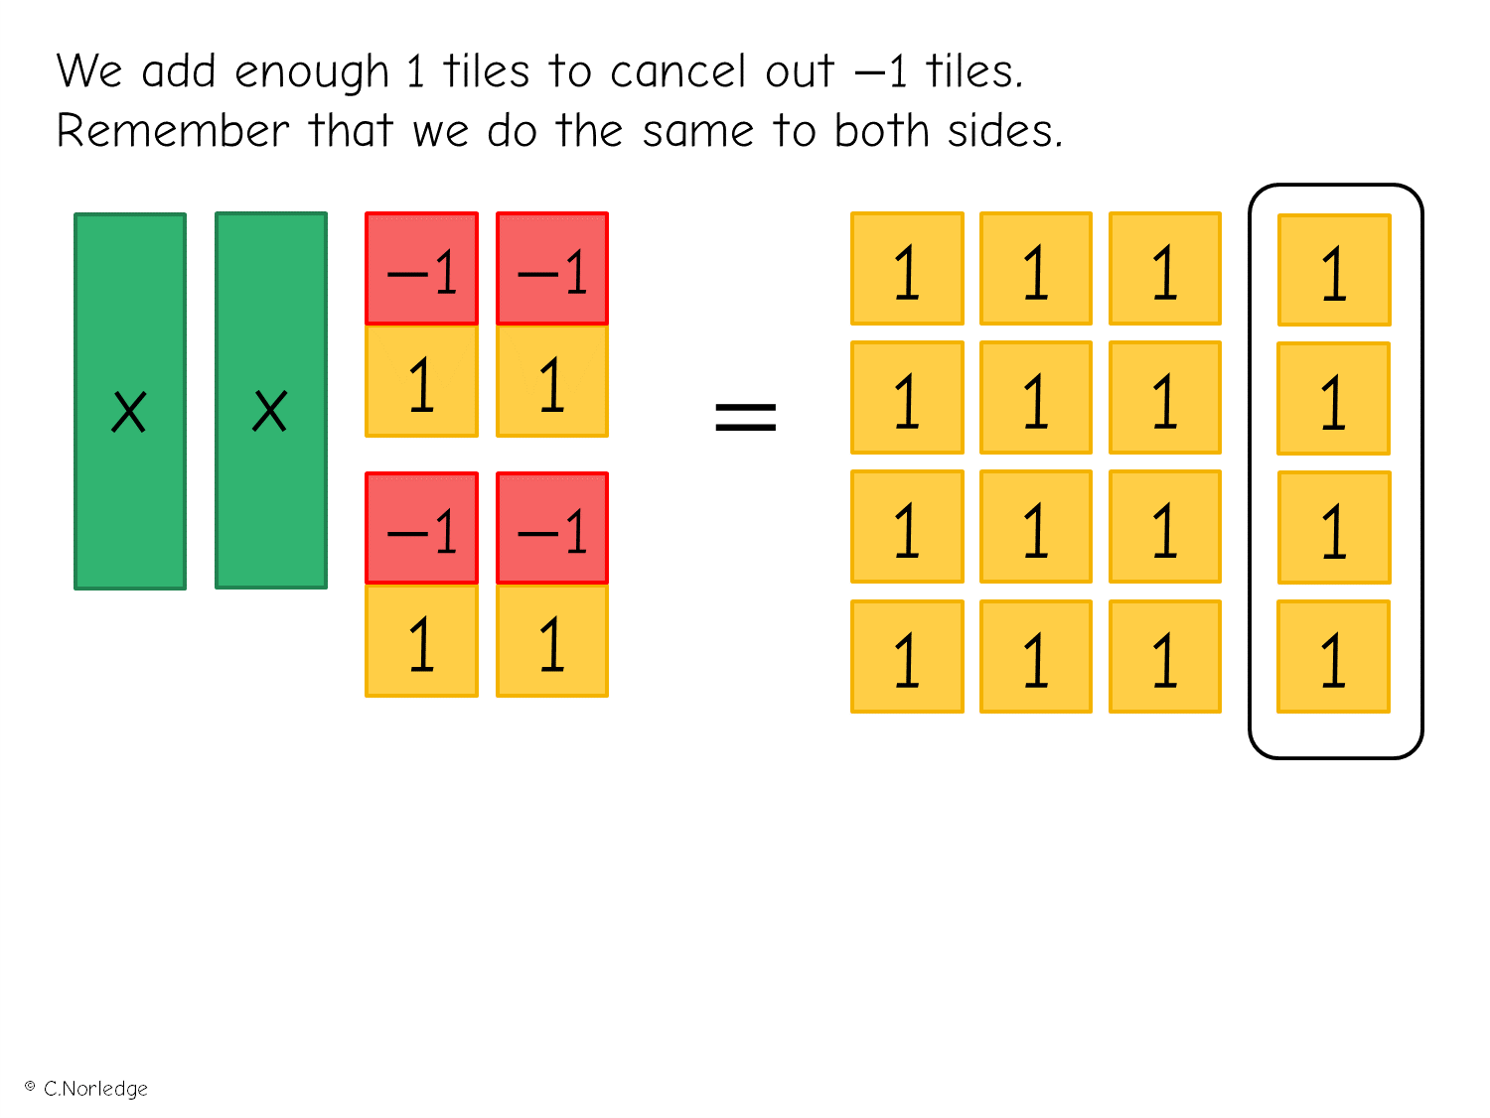
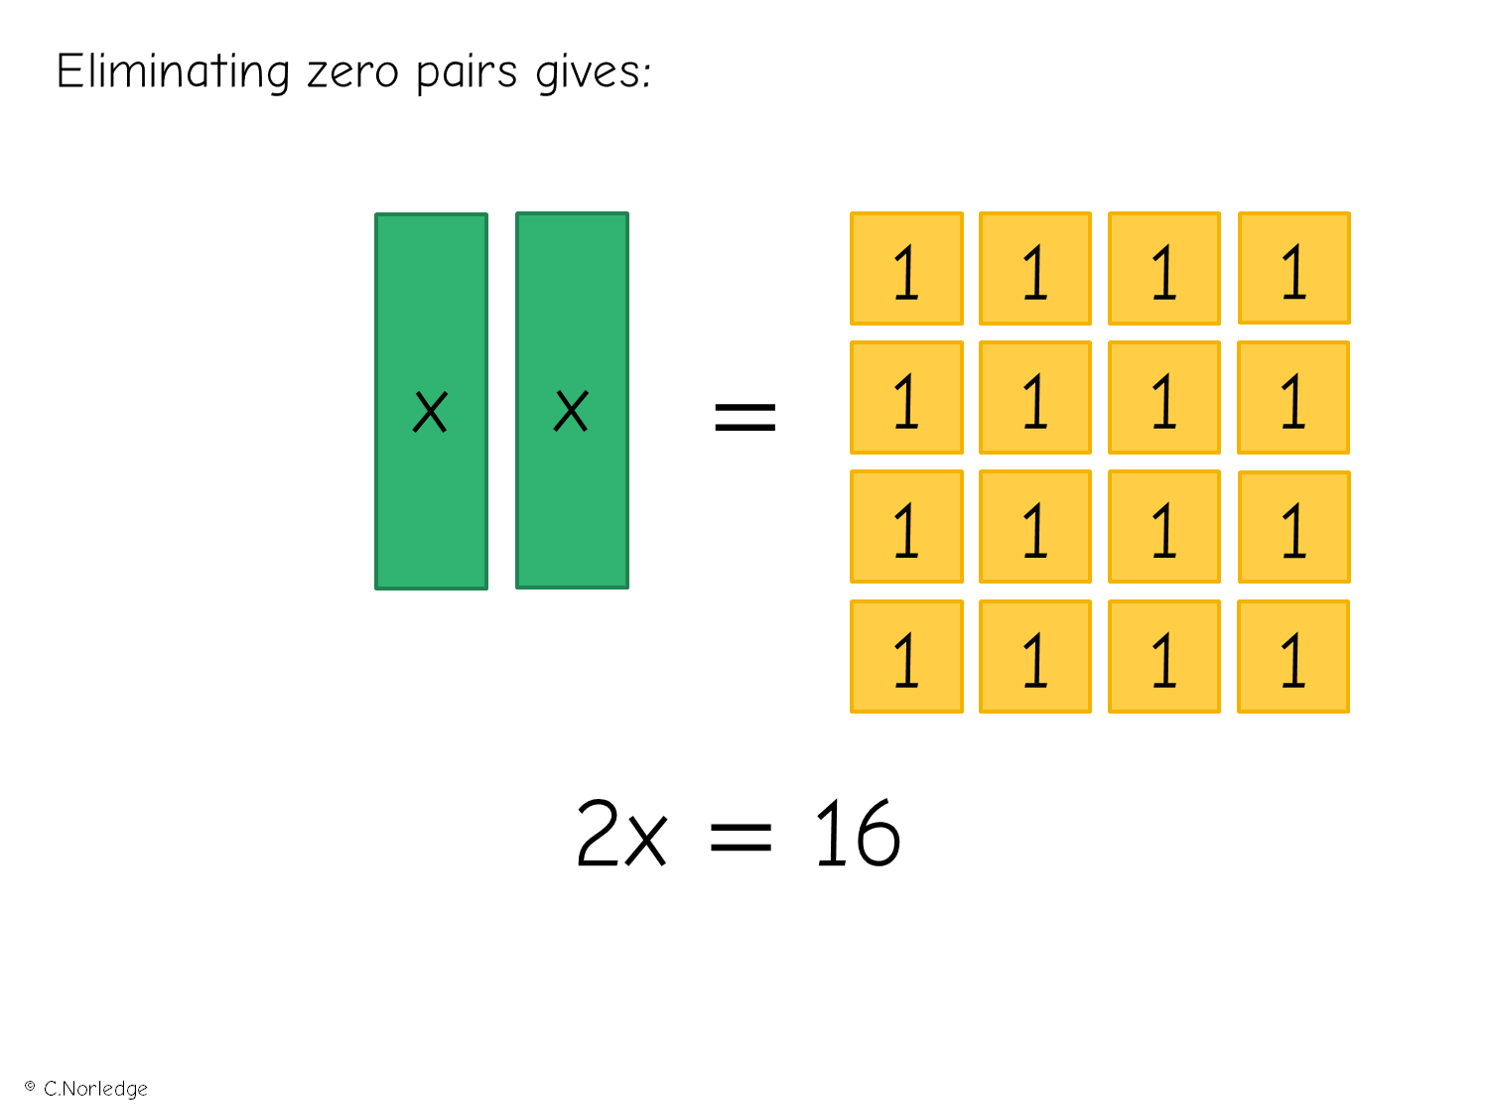
This worked brilliantly with the groups I trialed it with last year (from high-attaining Year 7s to low-attaining Year 9s), although it’s really important to encourage pupils to show their working algebraically as well – you can see how I do this in the video.
4. Multiple solution methods
Something that was embedding misconceptions rather than illuminating them was my presentation of examples and problems to pupils. Making up an equation on the spot, I’m more likely to come up with ax + b = c than b + ax = c or even c = b + ax. Now, I’m consciously trying to include examples of equations written every way round and getting pupils to think carefully about what effect (if any) this has.All of these equations are the same, but pupils usually see type 1 in textbooks and on worksheets.
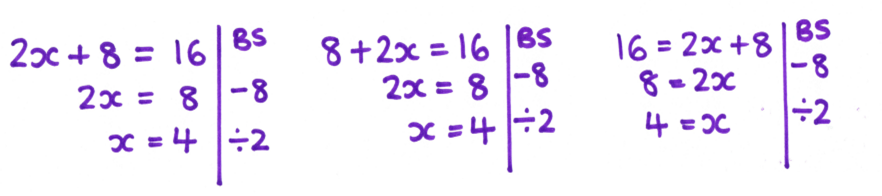
In addition to this, I’m also spending more time looking at alternative solutions, something else which has cropped up more frequently in lessons when pupils are using the algebra tiles rather than following my procedure. I had a lovely discussion with Year 7 last year about the similarities and differences in these two solutions, getting them to think critically about why we subtract 6 in the first example, but 3 in the second.
5. Looking for links
Where possible, I think it’s important that pupils are presented with relevant reasons to solve equations. It’s a great opportunity to link in prior knowledge, such as angles on a line or in a triangle, and get them to construct their own equations pretty much straight away.
I also now teach solving inequalities right after (or sometimes simultaneously to) solving equations. I was initially mystified that pupils who could solve complicated equations well somehow got in a complete muddle with inequalities, and I think some of that is our fault; it’s frequently presented as a completely disparate topic, not touched until Year 10 or 11, rather than essentially the same process with a different symbol in the middle.
Teaching solving equations Read More »
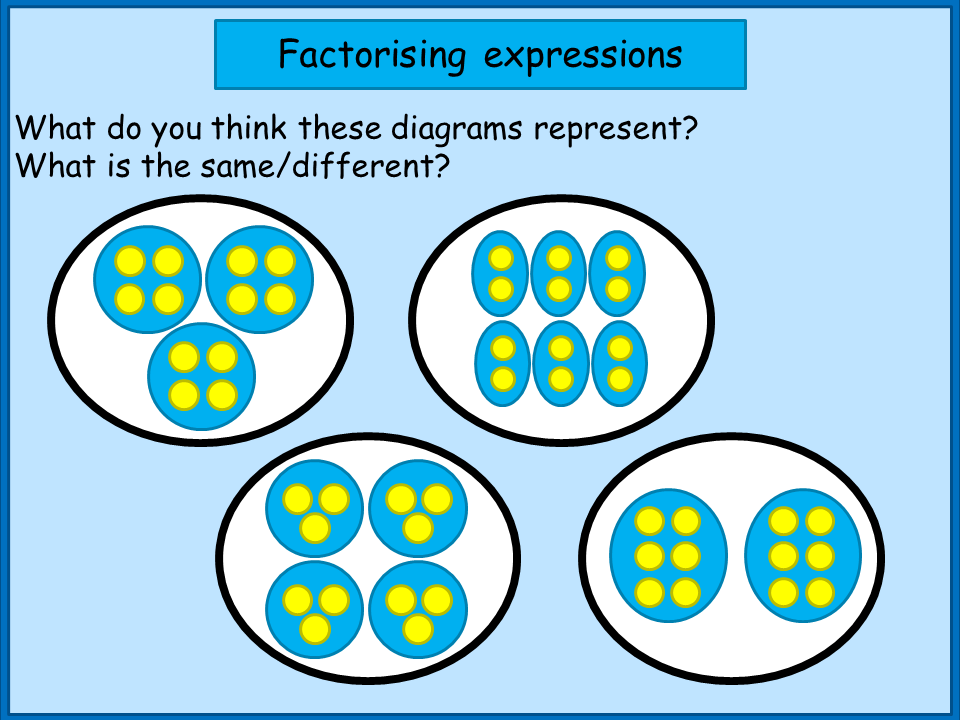
I usually start work on factorising algebraic expressions with a critical look at what factorising actually is and a few reminders of prior learning about factors. I pop up this diagram when pupils enter the classroom, and get them to think about what it is showing. We then have a discussion and collect ideas. The slide represents factors of 12, with different ways of grouping the factors. I remind the class what “factor” means, and ask them to explain how they can see factor pairs of 12 in the diagram. It’s good to link with ideas about division/grouping/sharing (e.g. the first diagram shows 12 as 3 groups of 4, so this is the same as 12 shared into 3 equal groups, or 12 ÷ 3).
I sometimes ask the class to draw representations of other numbers in a similar way. Suggested numbers: 10, 30, 16 (odd number of groupings because it is a square number), some small primes.
I then give each pair a set of algebra tiles, and ask them to work out/draw different ways to group 6x + 12. I emphasise the idea of sharing into equal groups, so each group should contain the same number of x tiles and 1 tiles, linking into our discussion about division earlier.
We then collect ideas as a class; it is very effective at this point to select pupils to demonstrate their ideas on the whiteboard at the front, especially if pupils have come up with different notation to represent groupings. Some pupils spontaneously use bracket notation to simplify their pictures, but if they haven’t, I push them towards this idea.
We compare two representations, such as 3(2x + 4) and 6(x + 2) and discuss which they think is more simple, pushing towards the idea that, when factorising, we make the groupings inside brackets as small/simple as possible.
I then get them to do some problems; if you download the resource, I’ve selected three sets of questions, red being the easiest and green the hardest. Pupils may wish to work through all three. I would discourage pupils from starting at the green problems straight away, as these involve using negative tiles. Pupils could do this in pairs using mini-whiteboards, or write/draw solutions in their books. If you make up your own questions, keep the numbers small to avoid too much fiddling and counting, and avoid removing a negative number as a factor.
When pupils are ready (and this is sometimes in the next lesson) we discuss how we can “spot” the groupings to choose without drawing diagrams each time – by looking for the largest common factor of both terms.
Factorising linear expressions using algebra tiles Read More »
This was the first lesson I taught using algebra tiles (you can find out about them here) and it’s my go-to way to introduce completing the square now. It’s worth starting with a little work on factorising first, just so you don’t completely blow their minds.
I start the lesson by considering representations of perfect squares, such as the example x² + 4x + 4, getting pupils to try to arrange the algebra tile representation of x² + 4x + 4 into a square, and pushing them towards the factored form (x + 2)². There are some lovely points for discussion of patterns in the coefficient of x and constant terms, which may be useful to draw out for further development into the “official formula” in later lessons.
Next, I get pupils to arrange x² + 4x + 3 into the best approximation to a square they can manage. They find out that they are missing one red tile to “complete” the square. We discuss the idea of being one tile short and having to “borrow” a tile to finish the square off, giving rise to (x + 2)² – 1.
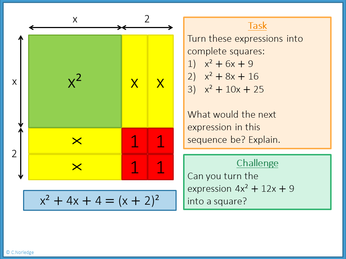
We then look at rearranging x² + 2x + 4 in a similar fashion, leading to the discovery that they have more tiles than they need to complete a square, and thus that x² + 2x + 4 can be written as (x + 1)² + 3, with +3 representing three additional tiles.
I then get pupils to do some on their own, using tiles and a template worksheet to support. A good challenge is to ask them to work with odd coefficients of x – pupils may suggest they need to “cut” the x strips in half, again leading nicely into development of the official formula.
Completing the square using algebra tiles Read More »