Resource missing

LOTW 10/05/15 Comparing and ordering fractions and decimals

In the spirit of encouraging personal positive thinking, I’ve decided to start a new Sunday blog series on the best lesson I’ve taught the previous week.

This week my pick actually covers two lessons of work, and was delivered to my Year 9s on Thursday and Friday. To provide a bit of context, we’re trialling the Mastery Pathway with KS3 this year, and pupils sat the Elementary 4 test on Tuesday, covering negative numbers, substitution and lots of fractions and decimals work. They passed the previous three tests pretty well, but this one caused some difficulties, with marks ranging from 30% to 70%. After doing a bit of analysis on the results, I decided that my first topic for re-teaching would be working with fractions and decimals, particularly ordering and converting between the two representations.

I’d tried the Standards Unit card sort with them a couple of weeks ago, and that didn’t really work for them – although they had a good go, it was too overwhelming for them. I decided to adapt it slightly, removing the percentage cards (we’ve not covered percentages at all yet in the Mastery Pathway), and changing the denominators to something slightly more friendly. I also added significantly more structure to the activity, interleaving skills practice with the card sort. The adapted version worked really well, and I’m pretty confident that I’ve plugged most of the gaps with most of them now – I’m planning a quick test next week to check.

1. Ordering fractions using a common denominator

We started with a “which is bigger” problem – I’ve previously blogged about how much I love this activity, and we did a lot of work at the start of the year with problems like these.

It was really positive to see that their mathematical explanations have come on leaps and bounds since the start of Year 9. We discussed the ideas of using a common denominator and pros and cons of bar and pizza modelling again. 

I then gave them four fairly standard problems to do. We discussed the importance of showing working out – on the test, many of them hadn’t shown their working, and had lost method marks. I asked them all to show clearly which common denominator they had used and how they converted the fractions.

I deliberately picked the fourth problem with a common denominator of 100, to lead us into the next bit on converting fractions to decimals.

Next, I handed out a set of fractions cards from the card sort I planned to use. I asked what they would pick as a common denominator for the nine fractions highlighted, and got the pupil who said “twentieths” to explain why. 

We also discussed what they would use as a common denominator for the whole set, and how they could find this. However, I wanted to focus on the twentieths to start with, so I got them to convert those, writing their answers on the cards.

2. Converting fractions to decimals

I then quickly retaught conversion of fractions to decimals with “easy” denominators. I was confident that they understood the concept and links with place value, as we spent quite a bit of time on this when I initially taught the topic, but they clearly hadn’t mastered it as many of them made errors with this on their assessment. We discussed a few examples, then I set them off with ten to do for themselves.

We spent a couple of minutes discussing different strategies for the final question, and I got two pupils to the board to demonstrate their alternative approaches: converting to a mixed number, then dealing with the fraction part, or converting to a denominator of 100 first, then converting to a mixed number.

The pupils then changed the first nine fractions into decimals using a denominator of 10 or 100. We discussed why the eighths might cause problems, and suggested that we could use a denominator of 1000. However, as I wanted them to try these using division, we didn’t change these too at this stage.

Next, we did a quick refresher on dealing with more difficult denominators using division. On their tests, many pupils had confused the numerator and denominator, with many instinctively putting the larger number under the “bus stop” and then getting in a mess. 

We talked about the fact that order matters with division – as an aside, I’ve stopped automatically correcting pupils when they say this the wrong way round, and instead asking them if they’re sure they mean “9 shared by 45” instead of “45 shared by 9”. I also reinforced correct use of recurring notation.

Finally, I got them to change the eighths cards using division. By this point, we’d reached the end of the first hour, so we quickly summarised to pick up where we’d finished off the previous lesson.

3. Converting decimals to fractions

We sped through this bit, as we covered this in lots of depth during Elementary 1. My main focus here was getting pupils to simplify their answers, particularly with a factor of 5 in the numerator and denominator, so I included plenty of examples of this type.

While they were doing these ten problems, I circulated to check they were cancelling down their final answers – often, all that was needed was a quick “point” at their page to prompt them to check again!

4. Putting it all together

For the remainder of the lesson, I got pupils to make a summary poster of all the work we’d done, using the cards we’d worked on in the previous lesson. They drew a number line on a sheet of A3 paper, and ordered the twentieths cards, then matched up the decimal equivalents. We used the decimal equivalents of eighths to position these on the number line, then I demonstrated checking this by converting all the fractions to eightieths.  

I’ll add some pictures of the finished posters tomorrow.

Evaluation and final thoughts

This lesson is a lot more “I do, then you do” than most of my lessons, but it seemed to work really well for the pupils. Most of them found it a real confidence booster, and enjoyed the opportunity to just reinforce skills they were shaky on. They found the card sort much more accessible with a step-by-step approach. I’d use this again next year with a similar group, possibly adding a few extra cards for fractions greater than 1.

LOTW 10/05/15 Comparing and ordering fractions and decimals Read More »
How I teach trigonometry in right-angled triangles

I’ve been teaching trigonometry from scratch with Year 10 this week, so thought it would be a good opportunity to blog about the way I introduce sine, cosine and tangent. This is another sequence of lessons I love teaching, because it’s one of my tried and tested approaches and seems to work well each year.

​We started the lesson with a few quick questions on Pythagoras’ theorem (I used these ones). I taught them Pythagoras’ theorem way back in November, but most of them remembered how to solve the problems with a bit of prompting. I was aiming to refresh identification and use of the word “hypotenuse” and also provide a link from something they’d previously learned about right-angled triangles. After we’d done this, it was on to the first bit of the trigonometry introduction!

1. The relationship between lengths and angles
After trying a few different approaches in my first few years of teaching, I’ve settled on introducing trigonometry by drawing and measuring triangles. When I taught this initially, I used three nested similar triangles, but I found that this caused confusion for some pupils, as they couldn’t see the three separate triangles clearly. I adapted this to look at the triangles separately last year (see this video on YouTube if you’re interested in a tutorial for pupils to follow), but I decided to try two similar and one different this year. 

I asked the pupils to draw the three triangles in their exercise books, measure the length of the hypotenuse and angle theta and record their results. Next I introduced “opposite” and “adjacent” terminology and we added those column headings to their table. I then got them to calculate opp/hyp, adj/hyp and opp/adj using calculators and add their results to the table.

We discussed what we saw from the results; why were the results for triangles A and B identical, but the results for C were different? We got to the idea that there was a link between the side measurements and the angle we’d measured, and that if the triangle was enlarged, both the angle and the ratio of the measurements would stay the same.

2. Using trig tables
When I first tried this way of introducing trigonometry, I got pupils to then work out sine, cosine and tangent of the angles on their calculators, and spot that these came out with the same results, moving quite quickly on to missing angle problems the same lesson. However, in the last couple of years, I’ve avoided calculators altogether for the first lesson or two, and got pupils using trig tables instead. 

So after the activity above, I handed out a set of trig tables (download a copy here) and got them to look at the rows corresponding to the angles in their triangles. We spotted that our results matched fairly well with the values in the tables, and discussed how inaccuracy in measurements could have contributed to our results being slightly out.

By this point we were reaching the end of the lesson, so to finish off, I taught them the names of the three ratios, emphasising that these are just relationships between two sides on a right-angled triangle (for now!).

3. Writing sine, cosine and tangent ratios
After a few more Pythagoras problems to kick the lesson off, I set the pupils off on a task focused on labeling sides and writing trigonometric ratios correctly. I gave them a set of triangles with all three side lengths shown and asked them to write down the ratios for sine, cosine and tangent for each triangle. Once they’d done this, they worked out the decimal values of each one on their calculators, then it was back to the trig tables to work out an approximate value for the angle.

4. Traditional GCSE problems
By this time, they were getting a bit fed up with the tables; a couple of them were complaining that their eyes were going funny from squinting at the values, and one pupil said “but surely we don’t get this in the exam?”. So at this point I showed them three examples of some more traditional exam-type problems (with two sides and a missing angle), and also demonstrated how they could use the inverse sine, cosine and tangent buttons on their calculators rather than struggling with the tables, explaining that the inverse buttons were just working backwards from the trigonometric ratio to the angle. The rest of the lesson was spent practising these new skills using questions from a textbook.

(I almost felt the need to write an apology there for referring to textbook use, then stopped myself. I think it’s absolutely vital that time is built into maths lessons for skills practice, and sometimes the best way to do that is to get them to work through some carefully selected problems independently).

I’ll blog next week about where we go from here. I’m in two minds about continuing to finding missing sides (which is what I’d usually do), or alternatively doing more in-depth problem solving using angles first – but I’ve got a few days to think about it!

How I teach trigonometry in right-angled triangles Read More »

Teaching rounding

1. Crack place value first
This might seem like a no-brainer, but teaching rounding on top of an insecure understanding of place value is a recipe for disaster. Before pupils can get their heads around rounding, particularly to a given number of decimal places, they need to understand why 0.43 is bigger than 0.413, otherwise the whole thing’s a write-off.

2. Work with human number lines
When I teach rounding for the first time, I like to get pupils out at the front with mini-whiteboards to model a number line. For example, I might start with two pupils holding 10 and 20 at either end at the front of the room, then hand intermediate numbers to other pupils and get them to stand in the correct position on the number line. It’s then useful to have a discussion about which end (pupil) they are closest to and how this relates to rounding “to the nearest 10”.

3. Be really careful in discussing what happens with fives
I think it’s important that pupils realise that 15 is exactly in the middle of 10 and 20, and the decision to round up is arbitrary and done by convention. I remember having a 20 minute argument with a group of Year 11s in my training year who were convinced I was teaching upper bounds incorrectly because they’d grabbed onto the idea that “5 always rounds up”, so were seeing it as somehow closer to the next number up, rather than exactly in the middle.

4. Also be really careful about “rounding down”
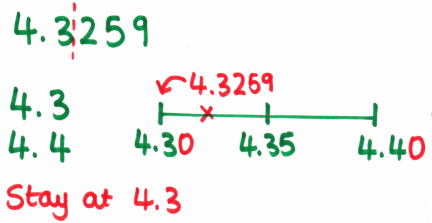
This is something I’ve only thought about this year when I found several Year 11 pupils “rounding down” by subtracting – i.e. rounding 24.52 (1dp) to 24.4. I’ve now started to say “stays at”, rather than “rounds down”, which seems to be working well.

5. Find a modelling technique that works
Having taught rounding at least seventeen million times, this is how I model it:

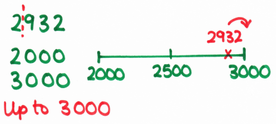
Rounding 2932 to the nearest 1000
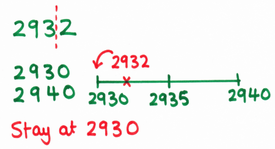
Rounding 2932 to the nearest 10
  • Mark position of digits you want.
  • Explicitly write down which two numbers it is between (e.g. 2932 is between the tens 2930 and 2940).
  • Draw a number line; mark the two tens boundaries, the middle and the number we’re rounding.
  • Look where it’s closest to; 2932 “stays at” 2930 to the nearest 10, but “rounds up” to 3000 to the nearest 1000.

As pupils get more confident, I gradually drop the number lines, then the boundary values, but keep the dotted line and stay/round up wording.

You can download a number line rounding worksheet here.

6. Reinforce rounding explicitly when teaching topics which naturally require it
When teaching any topics that typically require rounding in exam situations, make sure pupils are getting the rounding right every time. Mix up the rounding required; put some questions to decimal places and some to significant figures.

7. Look for other opportunities when working with whole numbers and decimals
If they’re practising written calculations such as multiplication or division, get them to round their answers as an additional step. Again, mix up the rounding as appropriate for the class currently. Decimal multiplication is particularly good for this.

Teaching rounding Read More »

Mix Match

A great quick activity to get pupils out of their seats; this works particularly well at the end of a lesson for an exit activity and can be used for most topics.

Prepare a set of cards before the lesson; I usually make simple pairs, but sets of 3 can also work quite well. 
Give each pupil a card and ask them to find their partner(s). I deliberately choose very similar examples so that pupils have to think carefully about their answers rather than just looking for someone with “matching” numbers. 

One of my favourite activities using Mix and Match is to support expanding and factorising quadratics. I picked examples differing only in signs, such as (x + 3)(x + 2), (x + 3)(x – 2) etc. Once pupils had found their partner, I asked each pair to find their partner pair, then group up into a family of 8. We then used these quadratic “families” as examples in later lessons when dealing with the inevitable issues with signs when factorising.

Mix Match Read More »

Pass the Problem

This is a great way to get pupils collaborating in the classroom and focusing on the steps to solve problems. 

Put pupils into groups of four, then distribute four problems. Each pupil solves a step before passing to the left and so on, until each problem has a complete solution. 

This works well for simple practise or working on exam technique for longer problems, as it encourages clarity in working out. It also allows lots of time for peer support, so could be done with a pair of higher-attaining and lower-attaining pupils per group.

Pass the Problem Read More »

Factorising linear expressions using algebra tiles

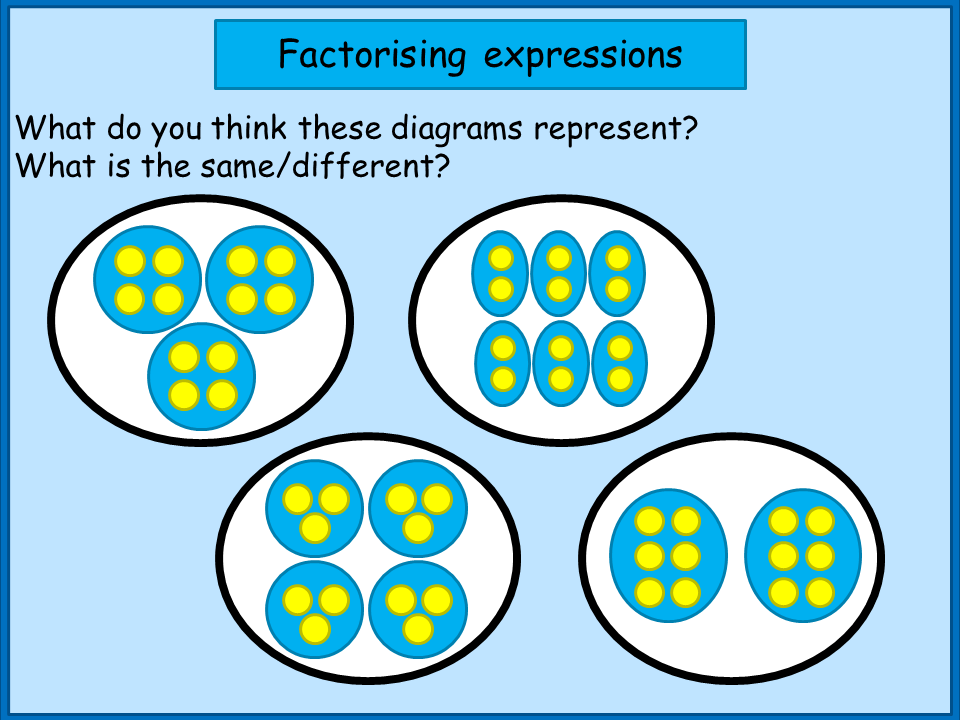
I usually start work on factorising algebraic expressions with a critical look at what factorising actually is and a few reminders of prior learning about factors. I pop up this diagram when pupils enter the classroom, and get them to think about what it is showing. We then have a discussion and collect ideas. The slide represents factors of 12, with different ways of grouping the factors. I remind the class what “factor” means, and ask them to explain how they can see factor pairs of 12 in the diagram. It’s good to link with ideas about division/grouping/sharing (e.g. the first diagram shows 12 as 3 groups of 4, so this is the same as 12 shared into 3 equal groups, or 12 ÷ 3).

I sometimes ask the class to draw representations of other numbers in a similar way. Suggested numbers: 10, 30, 16 (odd number of groupings because it is a square number), some small primes.

I then give each pair a set of algebra tiles, and ask them to work out/draw different ways to group 6x + 12. I emphasise the idea of sharing into equal groups, so each group should contain the same number of x tiles and 1 tiles, linking into our discussion about division earlier.

We then collect ideas as a class; it is very effective at this point to select pupils to demonstrate their ideas on the whiteboard at the front, especially if pupils have come up with different notation to represent groupings. Some pupils spontaneously use bracket notation to simplify their pictures, but if they haven’t, I push them towards this idea. 

We compare two representations, such as 3(2x + 4) and 6(x + 2) and discuss which they think is more simple, pushing towards the idea that, when factorising, we make the groupings inside brackets as small/simple as possible.

I then get them to do some problems; if you download the resource, I’ve selected three sets of questions, red being the easiest and green the hardest. Pupils may wish to work through all three. I would discourage pupils from starting at the green problems straight away, as these involve using negative tiles. Pupils could do this in pairs using mini-whiteboards, or write/draw solutions in their books. If you make up your own questions, keep the numbers small to avoid too much fiddling and counting, and avoid removing a negative number as a factor.

When pupils are ready (and this is sometimes in the next lesson) we discuss how we can “spot” the groupings to choose without drawing diagrams each time – by looking for the largest common factor of both terms.

Factorising linear expressions using algebra tiles Read More »

Completing the square using algebra tiles

This was the first lesson I taught using algebra tiles (you can find out about them here) and it’s my go-to way to introduce completing the square now. It’s worth starting with a little work on factorising first, just so you don’t completely blow their minds.

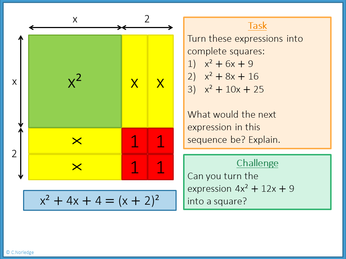
I start the lesson by considering representations of perfect squares, such as the example x² + 4x + 4, getting pupils to try to arrange the algebra tile representation of x² + 4x + 4 into a square, and pushing them towards the factored form (x + 2)². There are some lovely points for discussion of patterns in the coefficient of x and constant terms, which may be useful to draw out for further development into the “official formula” in later lessons.

Next, I get pupils to arrange x² + 4x + 3 into the best approximation to a square they can manage. They find out that they are missing one red tile to “complete” the square. We discuss the idea of being one tile short and having to “borrow” a tile to finish the square off, giving rise to (x + 2)² – 1.

We then look at rearranging  x² + 2x + 4 in a similar fashion, leading to the discovery that they have more tiles than they need to complete a square, and thus that x² + 2x + 4  can be written as (x + 1)² + 3, with +3 representing three additional tiles.

I then get pupils to do some on their own, using tiles and a template worksheet to support. A good challenge is to ask them to work with odd coefficients of x – pupils may suggest they need to “cut” the x strips in half, again leading nicely into development of the official formula.

Completing the square using algebra tiles Read More »

Discovering pi

As Pi Day rolls round again, I’ve pinched one of my colleague’s “Pi Kits” and have now done this lesson with Year 7, 8 and 9 this week. It’s my favourite way of teaching circumference and area of a circle, both the first time pupils encounter it and as a reminder before teaching any new circle topics. I’m surprised that some pupils have often come across pi prior to this lesson, or can even quote the formulae for circumference and area, but have almost no understanding of what it is and why it’s so fundamentally important in circles.

I changed things a bit this year; usually I just investigate circumference and diameter, then do a bit of bluffing about how pi miraculously “pops up” in the area formula too. However, I extended my investigation this year to include area for some groups, and it worked really well.

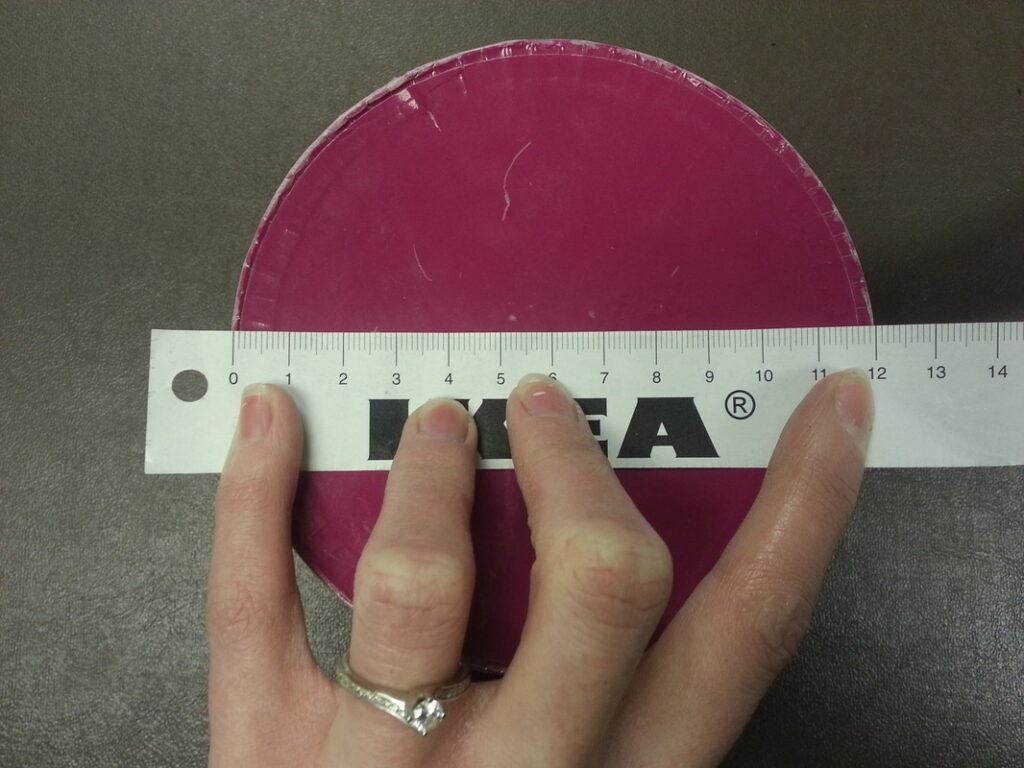
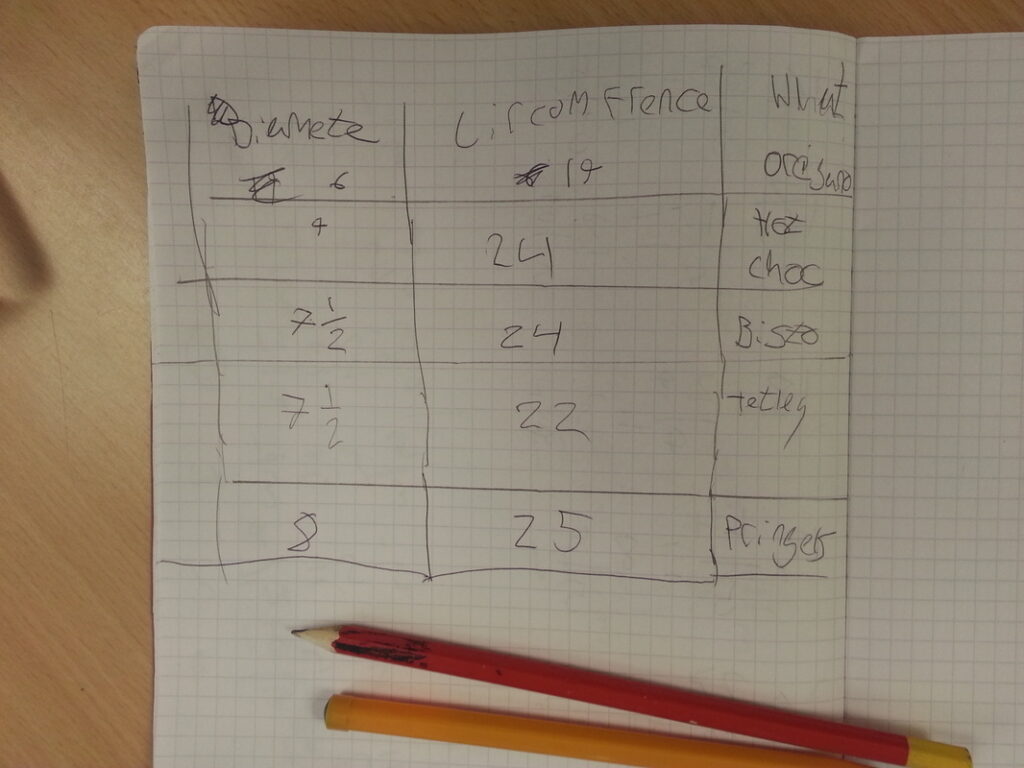
Measuring the diameter…
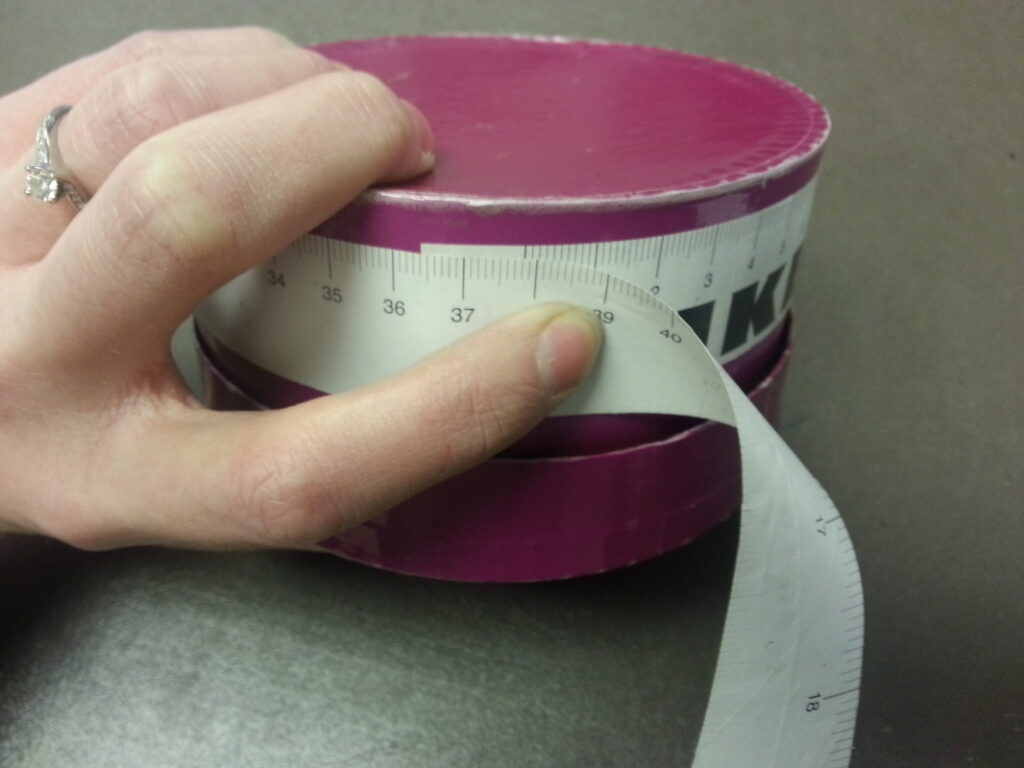
…and the circumference.

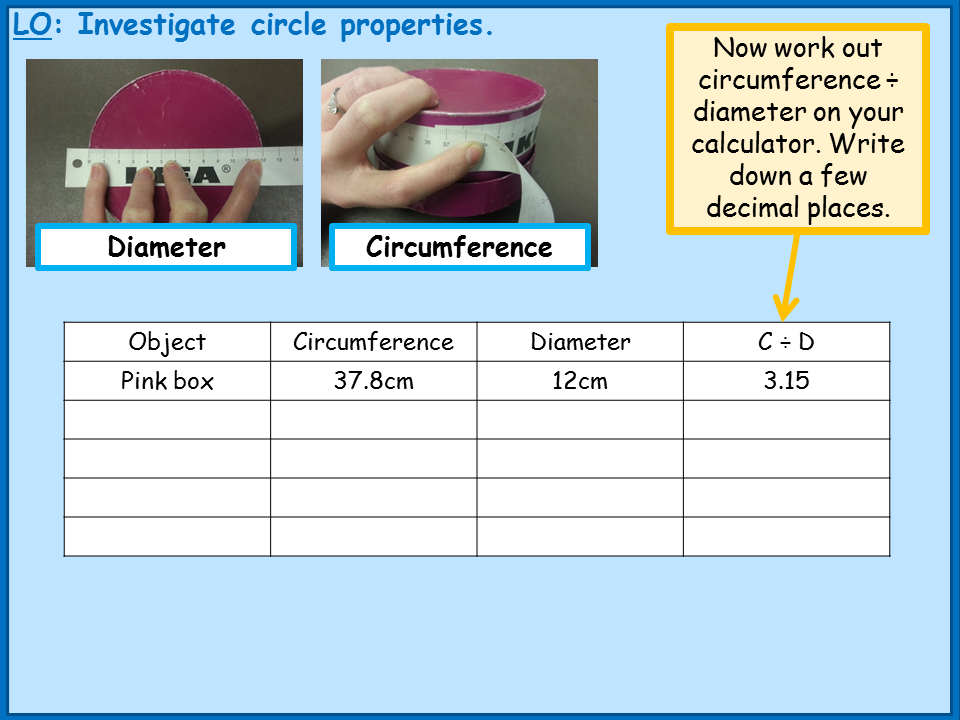
Our “Pi Kits” consist of a load of cylindrical objects (Pringles tubs and the like) and a huge wodge of Ikea paper measuring tapes (kindly donated – I think my colleague just went in and asked for a load). 

I started off the lesson with a bit of discussion about what they already know about circles. I then went through the terminology (circumference, diameter, radius, area), then explained that we’d be investigating links between these measurements.

In the first part of the lesson, I got pupils to measure circumference and diameter, then divide circumference by diameter. Most of my classes were pretty accurate, although I did have one pupil who spent the whole lesson working in inches – interesting in itself because we got to discuss why his results were the same as everyone else’s!

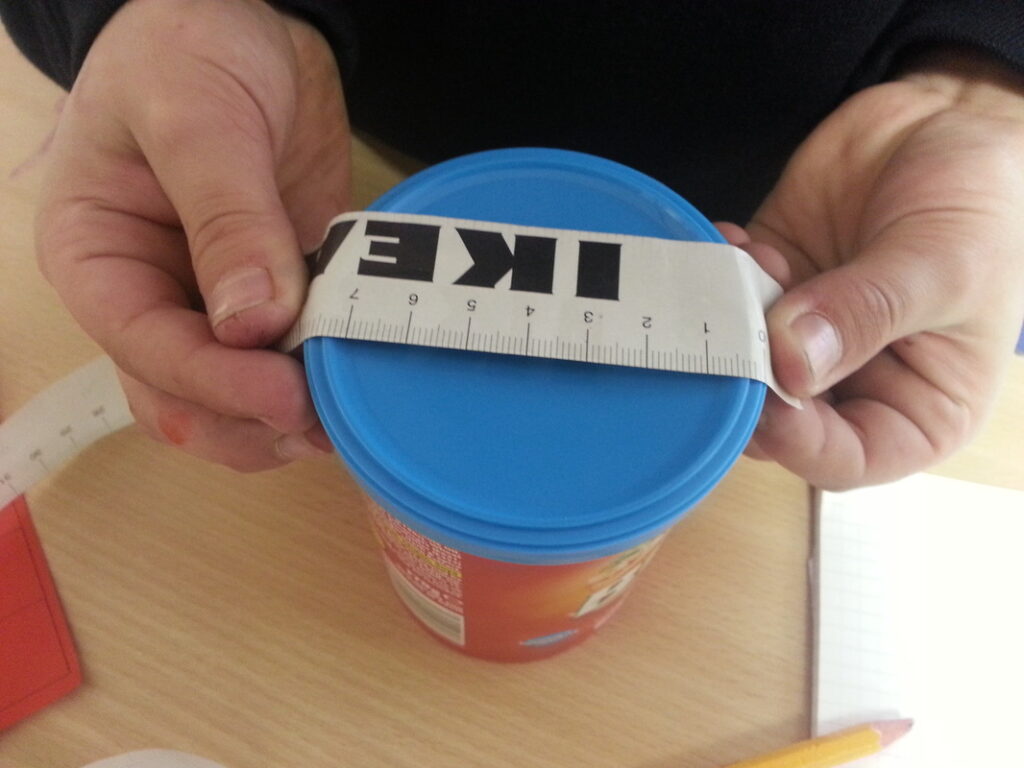
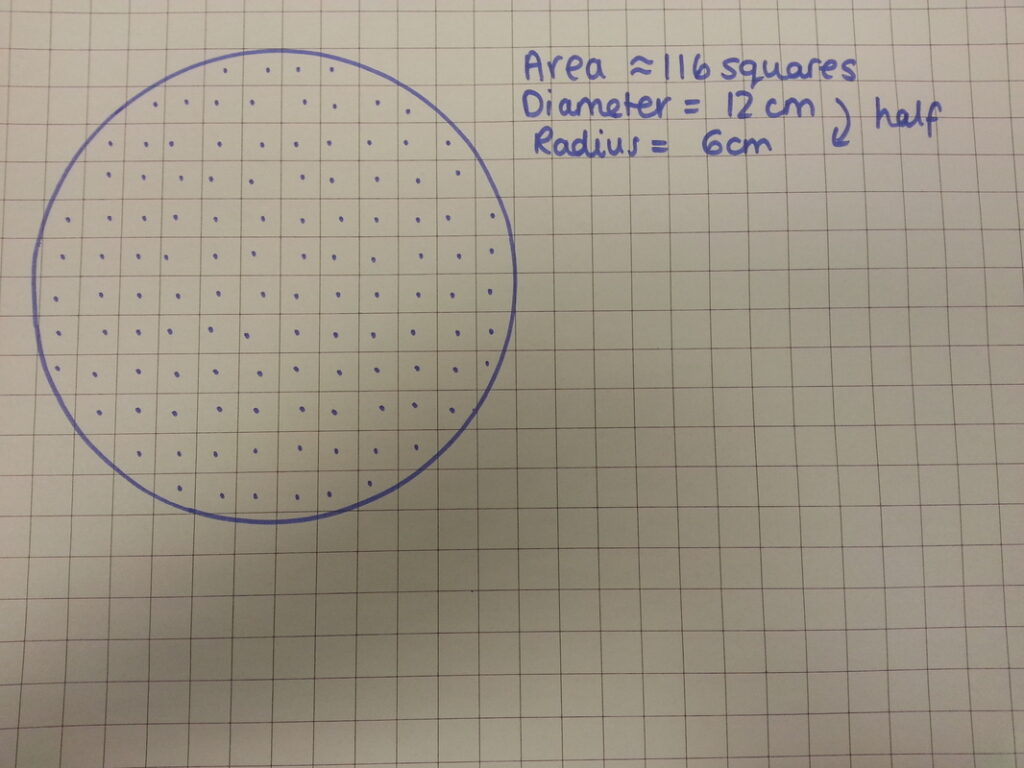
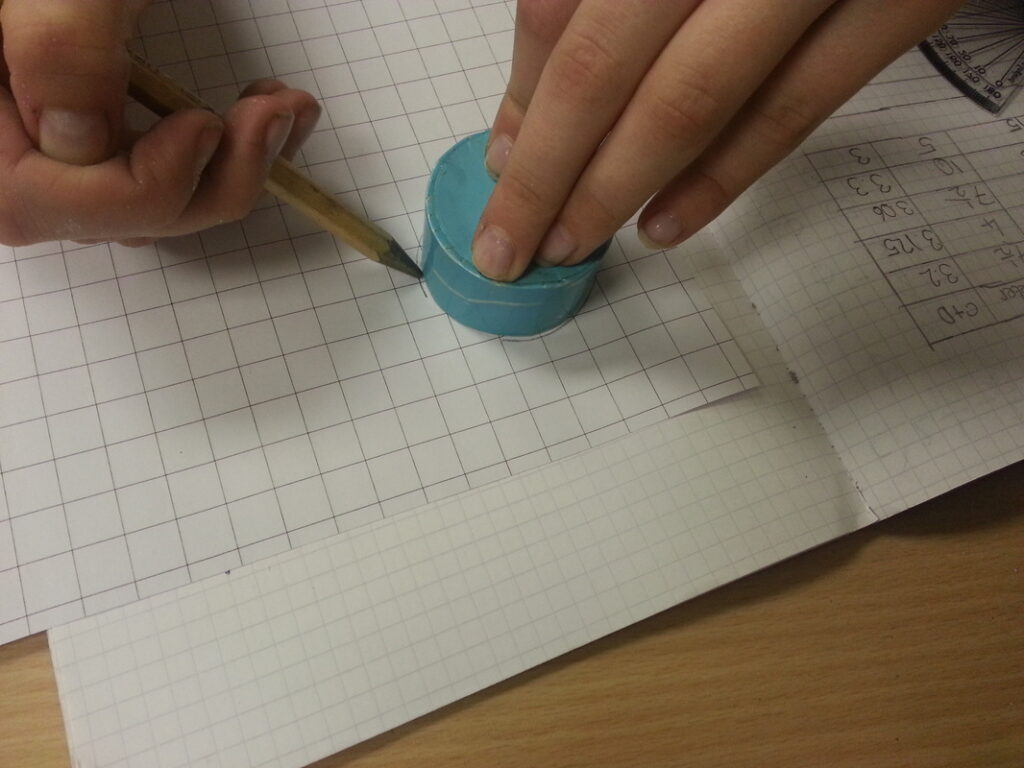
I then talked for a bit about area and prompted pupils towards using squared paper to estimate the area of their circles. Pupils then drew round their cylinders on squared paper and counted squares to estimate the area. Finally I got them to calculate area divided by radius squared, and it was quite satisfying to see “3 and a bit” pop up again in loads of their answers. 

My example…
…and discovering for themselves.

I like finishing off any first lesson involving pi by showing them pi to a million places. It’s also quite nice to let them “find” things in pi, such as their birthdate or mobile phone number (you can use Ctrl-F to do this on the webpage).

Discovering pi Read More »

Introducing pie charts using the average day

This was one of the first lessons I wrote in the first year of my teaching career, and is still one of my favourite ways to introduce pie charts. There’s also loads of scope for adding extra stuff in, such as work on fractions and percentages if appropriate for the group.

Pupils begin by thinking of the activities that make up their average day, and use a 24-sector pie chart template to colour-code this. They then look at the fractions of their day spent on various activities. Using a life expectancy of 80 years, they then calculate how many years they spend in total over one lifetime on each activity. To finish off, I’ve recently added this video to the end of the lesson, which looks at representing the average life as a pile of jelly beans.

Introducing pie charts using the average day Read More »

Teaching Pythagoras’ theorem

I absolutely love teaching Pythagoras’ theorem – not sure why, but I suspect it has something to do with the sense of “wow” I got when I first learned about it and realised that maths isn’t all about doing sums. There’s loads of really interesting stuff you can do with it, and as the first real theorem that most pupils will meet, I think it’s worth doing it justice.

1. Discover the theorem

My favourite way to introduce Pythagoras’ theorem happens to also be the first lesson I ever taught – before I even got a GTP place and to a group of (then) very scary looking Year 11 boys. I think it has a special place in my heart for that reason, but it seems to work well, so I drag it out every year. It takes a bit of preparation, but is well worth doing. I’ll add that this idea isn’t my own, and was shamelessly pinched from a fantastic teacher I had the joy of observing and working with for two weeks on the Students Associate scheme when it was still running.

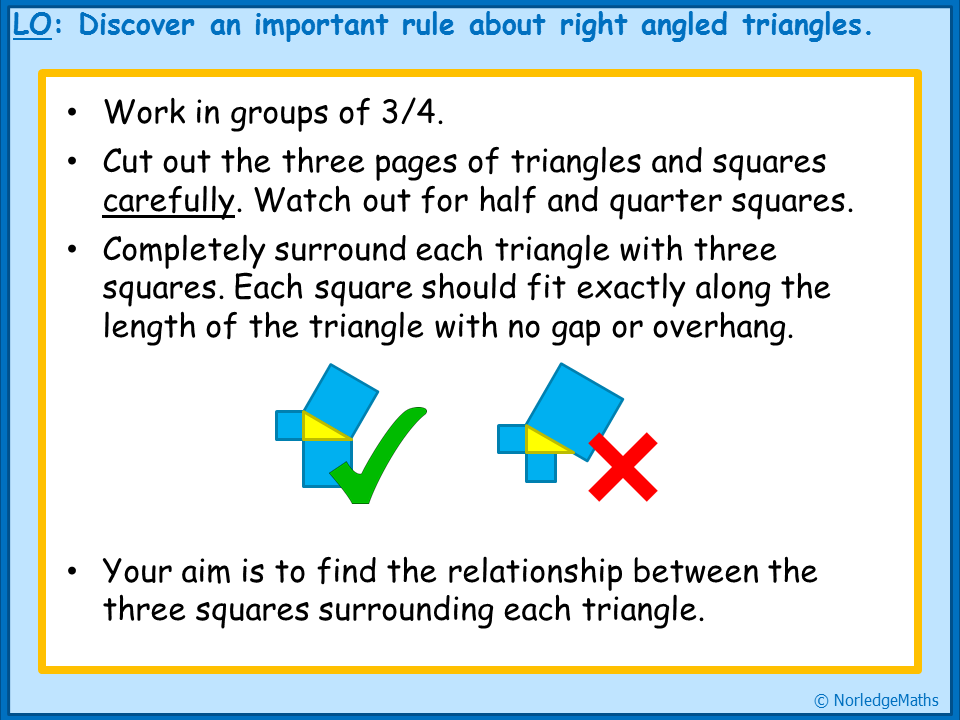
You need a selection of pre-drawn triangles and squares on centimetre paper. Include the typical 3, 4, 5 and 6, 8, 10 triangles, but some simple ones with half-units also work quite well. You also need a large piece of paper (two sheets of A3 stuck together does the trick) and glue for each pair or group. Alternatively, follow the links to download my version.

Give the pupils the pieces of paper (or cut them out beforehand if you’re feeling generous), with the instruction that they need to completely surround each triangle with three squares. If they are cutting, make sure they do it accurately – I’ve previously had pupils “correct” my squares by cutting the half-squares off the end! It’s worth checking their work carefully before you let them glue it down, as some have a tendency to match up in a “that will do” way, rather than making sure the squares are exactly the right length.

Once they’ve done this, I ask them to work out the area of each square (they can do this by counting or multiplying), then look for a link, annotating on their posters as they go. Towards the end, I pull the class back together and we discuss what we’ve found out. Depending on where I’ve judged their understanding, I’ll go straight to the algebraic representation or leave this for the next lesson.

I also like to tell the pupils a story my dad told me when he taught me Pythagoras’ theorem; I vividly remember sitting in our dining room at home, looking at the square tiles on the floor, and hearing about Pythagoras pacing around the temple in Samos looking at patterns on the floor, and this was how he came up with his theorem.

Obviously, this story has absolutely no historical basis whatsoever, but it works mathematically, so it’ll do for me!

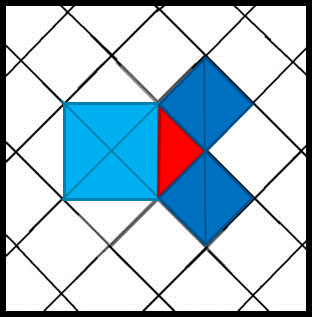
Pythagoras tiling: Two smaller dark blue squares make one large light blue square.

2. Formalise using algebra

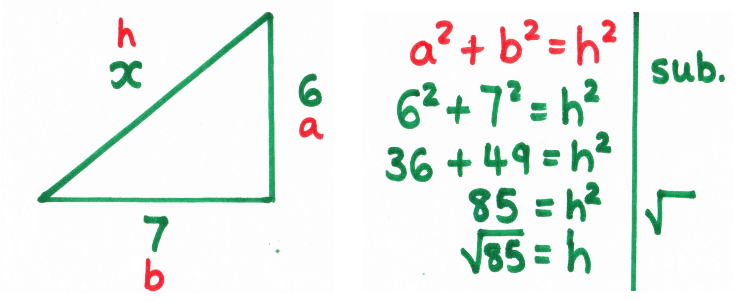
I usually then spend some time working on developing and formalising an algebraic approach – I think this is important for embedding algebraic manipulation skills and can avoid issues with whether to add or subtract the areas. Getting pupils in the habit of labeling their sides (a, b and h) helps when introducing trigonometry later. I use the same line “notation” I use when solving equations to reinforce links between substitution into a formula and solving strategies.

Picture

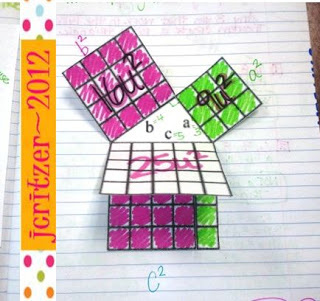
Last year I used a fantastic idea I found on Math Foldables to get pupils to create a little visual reminder that Pythagoras’ theorem is linked to the area of the squares on the sides.

Picture

Then it’s time for lots of examples and independent practice! No escaping this – pupils need to spend the time working through problems themselves. One thing I do differently now to when I started teaching is mix up hypotenuse and short side problems; teaching them separately just encourages pupils to learn one method for one and one for the other, whereas they really need to be able to identify if they’re trying to find a hypotenuse or a short side.

3. Don’t shy away from surds

I think this is particularly important for groups of pupils who may go on to A Level, as I still have pupils who don’t understand that the decimal answer a calculator gives is an approximation, not the “exact value”. If your scheme of work allows, teach surds first. Then there’s lots of scope for practising surd simplification at the same time. If not, don’t get the calculators out until they’ve shown they are happy to leave their answers as surds.

4. REAL real life applications

Pythagoras’ theorem is actually really useful for creating right angles in construction or building. Builder’s squares work on the inverse of Pythagoras’ theorem (that if a² + b² = h² then the triangle must contain a right angle). I’ve also used string knotted at intervals to create a 3, 4, 5 triangle to show that, when pulled out straight, it creates a right angle. 

5. If all else fails…

We all know that teaching for understanding goes out the window before exams, so if you’ve got pupils who still don’t get Pythagoras’ theorem, SASH (Square Add Square Root to find the Hypotenuse) and SSSS (Square Subtract Square Root to find a Short Side) have worked for me as a very last minute fix.

Teaching Pythagoras’ theorem Read More »