how i teach

How I teach trigonometry in right-angled triangles

I’ve been teaching trigonometry from scratch with Year 10 this week, so thought it would be a good opportunity to blog about the way I introduce sine, cosine and tangent. This is another sequence of lessons I love teaching, because it’s one of my tried and tested approaches and seems to work well each year.

​We started the lesson with a few quick questions on Pythagoras’ theorem (I used these ones). I taught them Pythagoras’ theorem way back in November, but most of them remembered how to solve the problems with a bit of prompting. I was aiming to refresh identification and use of the word “hypotenuse” and also provide a link from something they’d previously learned about right-angled triangles. After we’d done this, it was on to the first bit of the trigonometry introduction!

1. The relationship between lengths and angles
After trying a few different approaches in my first few years of teaching, I’ve settled on introducing trigonometry by drawing and measuring triangles. When I taught this initially, I used three nested similar triangles, but I found that this caused confusion for some pupils, as they couldn’t see the three separate triangles clearly. I adapted this to look at the triangles separately last year (see this video on YouTube if you’re interested in a tutorial for pupils to follow), but I decided to try two similar and one different this year. 

I asked the pupils to draw the three triangles in their exercise books, measure the length of the hypotenuse and angle theta and record their results. Next I introduced “opposite” and “adjacent” terminology and we added those column headings to their table. I then got them to calculate opp/hyp, adj/hyp and opp/adj using calculators and add their results to the table.

We discussed what we saw from the results; why were the results for triangles A and B identical, but the results for C were different? We got to the idea that there was a link between the side measurements and the angle we’d measured, and that if the triangle was enlarged, both the angle and the ratio of the measurements would stay the same.

2. Using trig tables
When I first tried this way of introducing trigonometry, I got pupils to then work out sine, cosine and tangent of the angles on their calculators, and spot that these came out with the same results, moving quite quickly on to missing angle problems the same lesson. However, in the last couple of years, I’ve avoided calculators altogether for the first lesson or two, and got pupils using trig tables instead. 

So after the activity above, I handed out a set of trig tables (download a copy here) and got them to look at the rows corresponding to the angles in their triangles. We spotted that our results matched fairly well with the values in the tables, and discussed how inaccuracy in measurements could have contributed to our results being slightly out.

By this point we were reaching the end of the lesson, so to finish off, I taught them the names of the three ratios, emphasising that these are just relationships between two sides on a right-angled triangle (for now!).

3. Writing sine, cosine and tangent ratios
After a few more Pythagoras problems to kick the lesson off, I set the pupils off on a task focused on labeling sides and writing trigonometric ratios correctly. I gave them a set of triangles with all three side lengths shown and asked them to write down the ratios for sine, cosine and tangent for each triangle. Once they’d done this, they worked out the decimal values of each one on their calculators, then it was back to the trig tables to work out an approximate value for the angle.

4. Traditional GCSE problems
By this time, they were getting a bit fed up with the tables; a couple of them were complaining that their eyes were going funny from squinting at the values, and one pupil said “but surely we don’t get this in the exam?”. So at this point I showed them three examples of some more traditional exam-type problems (with two sides and a missing angle), and also demonstrated how they could use the inverse sine, cosine and tangent buttons on their calculators rather than struggling with the tables, explaining that the inverse buttons were just working backwards from the trigonometric ratio to the angle. The rest of the lesson was spent practising these new skills using questions from a textbook.

(I almost felt the need to write an apology there for referring to textbook use, then stopped myself. I think it’s absolutely vital that time is built into maths lessons for skills practice, and sometimes the best way to do that is to get them to work through some carefully selected problems independently).

I’ll blog next week about where we go from here. I’m in two minds about continuing to finding missing sides (which is what I’d usually do), or alternatively doing more in-depth problem solving using angles first – but I’ve got a few days to think about it!

How I teach trigonometry in right-angled triangles Read More »
Teaching rounding

1. Crack place value first
This might seem like a no-brainer, but teaching rounding on top of an insecure understanding of place value is a recipe for disaster. Before pupils can get their heads around rounding, particularly to a given number of decimal places, they need to understand why 0.43 is bigger than 0.413, otherwise the whole thing’s a write-off.

2. Work with human number lines
When I teach rounding for the first time, I like to get pupils out at the front with mini-whiteboards to model a number line. For example, I might start with two pupils holding 10 and 20 at either end at the front of the room, then hand intermediate numbers to other pupils and get them to stand in the correct position on the number line. It’s then useful to have a discussion about which end (pupil) they are closest to and how this relates to rounding “to the nearest 10”.

3. Be really careful in discussing what happens with fives
I think it’s important that pupils realise that 15 is exactly in the middle of 10 and 20, and the decision to round up is arbitrary and done by convention. I remember having a 20 minute argument with a group of Year 11s in my training year who were convinced I was teaching upper bounds incorrectly because they’d grabbed onto the idea that “5 always rounds up”, so were seeing it as somehow closer to the next number up, rather than exactly in the middle.

4. Also be really careful about “rounding down”
This is something I’ve only thought about this year when I found several Year 11 pupils “rounding down” by subtracting – i.e. rounding 24.52 (1dp) to 24.4. I’ve now started to say “stays at”, rather than “rounds down”, which seems to be working well.

5. Find a modelling technique that works
Having taught rounding at least seventeen million times, this is how I model it:

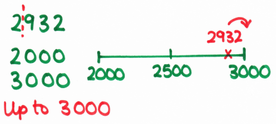
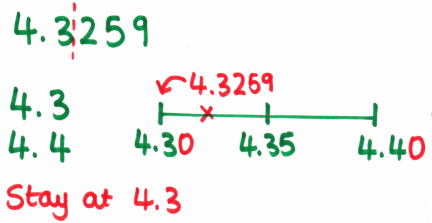
Rounding 2932 to the nearest 1000
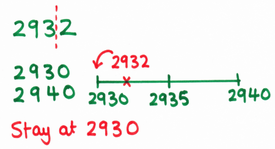
Rounding 2932 to the nearest 10
  • Mark position of digits you want.
  • Explicitly write down which two numbers it is between (e.g. 2932 is between the tens 2930 and 2940).
  • Draw a number line; mark the two tens boundaries, the middle and the number we’re rounding.
  • Look where it’s closest to; 2932 “stays at” 2930 to the nearest 10, but “rounds up” to 3000 to the nearest 1000.

As pupils get more confident, I gradually drop the number lines, then the boundary values, but keep the dotted line and stay/round up wording.

You can download a number line rounding worksheet here.

6. Reinforce rounding explicitly when teaching topics which naturally require it
When teaching any topics that typically require rounding in exam situations, make sure pupils are getting the rounding right every time. Mix up the rounding required; put some questions to decimal places and some to significant figures.

7. Look for other opportunities when working with whole numbers and decimals
If they’re practising written calculations such as multiplication or division, get them to round their answers as an additional step. Again, mix up the rounding as appropriate for the class currently. Decimal multiplication is particularly good for this.

Teaching rounding Read More »

From bar modelling to ratio tables – tidying up percentages

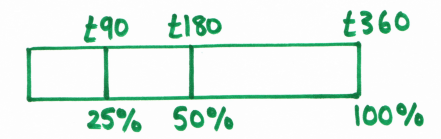
It’s no secret that I’m a big fan of bar modelling to get pupils to really think about the calculations they are doing. It’s a great way to introduce work with percentages too, and solidifies the link between percentage and fraction calculations. One particular advantage is the flexibility it affords – I had one pupil decide that the best way for her to find 15% was to work out 25% and 10%, then subtract one from the other, rather than the more “traditional” method we’d probably all teach of finding 10% and 5%, then adding together.Here’s 25% and 50% of £360 on a bar – easily found by halving and halving again.

Picture

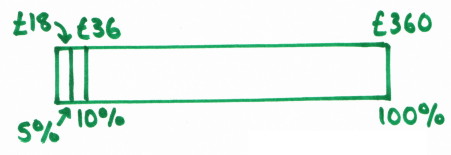
However, although I use bar modelling when introducing new concepts with percentages, once pupils have drawn enough bars to get the ideas, I then push them on to using ratio tables for calculations instead. The bar’s great for larger percentages, but once you get down to the useful building blocks like 10% and 5%, the left hand side of the bar starts looking very messy indeed. And you can forget trying to show 1% on a bar with a suitable scale for exercise books. Here’s 5% of £360 on a bar:

Picture

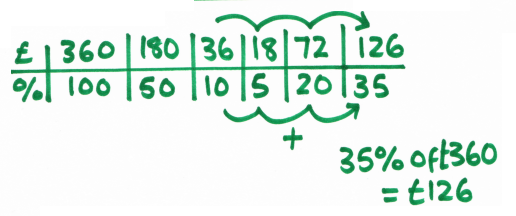
Now here’s a ratio table using £360 (I decided to find 35% in this example):

Picture

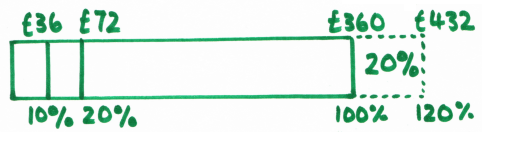
I love using these as the flexibility of the bar is preserved; pupils can still approach problems from different angles and, if they can’t see a clear route through a problem, they can at least work out some amounts to see if that helps. You can see that, although I’ve chosen to find 10%, 20% and 5% then add together, it would equally be fine to work out 30% from 3 x 10%, then add to 5%, or even work out 15% and subtract this from 50%, and some great classroom discussions come out of the different approaches pupils have used.Here’s a bar for £360 increased by 20%:

Picture

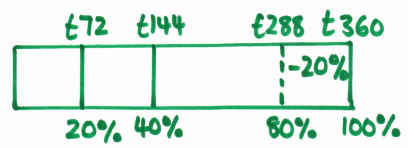
Bars are brilliant for encouraging pupils to think about the idea that increasing an amount by 20% is the same as finding 120% of something, which is useful for further work on percentage multipliers.And here’s a bar for £360 decreased by 20%:

Picture

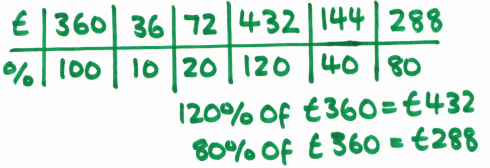
Again, you can see the link between a 20% decrease and finding 80% of that amount.It’s worth being very careful about how quickly you move away from bar modelling with percentage change problems; pupils need to be really confident with what 100% means in the context of the problem. However, once they’re fine with that, here’s a ratio table for £360, with both a 20% increase and 20% decrease shown:

Picture

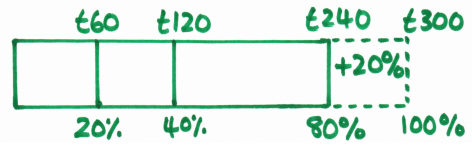
The next logical step is reverse percentages – finding the original price if you know the increased or reduced price. Here’s a bar for an item costing £240 with a deduction of 20%:

Picture

Because there’s so much scope for confusion with these, I’d spend a lot more time using bars with pupils until I’m satisfied they can satisfactorily distinguish between these and standard increases or decreases. The bar has a distinct advantage here that it’s more difficult to make the mistake of dividing £240 by 10 to get 10%, because it’s more intuitive to work down in halves.

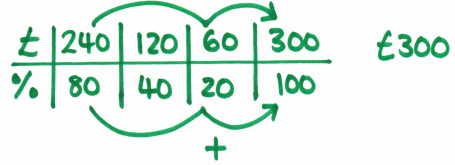
Here’s the ratio table:

Picture

Because ratio tables are quick and easy to draw, I encourage them in exam situations for non-calculator problems, particularly for those pupils who get lost in their working out and tend to just scribble their calculations all over the page.

Ratio tables are also fantastic for other problems, such as all the proportion stuff like currency conversion. There’s also a direct link to proportion graphs, as you’ve got your table of values to create the graph straight away.

From bar modelling to ratio tables – tidying up percentages Read More »

Teaching Pythagoras’ theorem

I absolutely love teaching Pythagoras’ theorem – not sure why, but I suspect it has something to do with the sense of “wow” I got when I first learned about it and realised that maths isn’t all about doing sums. There’s loads of really interesting stuff you can do with it, and as the first real theorem that most pupils will meet, I think it’s worth doing it justice.

1. Discover the theorem

My favourite way to introduce Pythagoras’ theorem happens to also be the first lesson I ever taught – before I even got a GTP place and to a group of (then) very scary looking Year 11 boys. I think it has a special place in my heart for that reason, but it seems to work well, so I drag it out every year. It takes a bit of preparation, but is well worth doing. I’ll add that this idea isn’t my own, and was shamelessly pinched from a fantastic teacher I had the joy of observing and working with for two weeks on the Students Associate scheme when it was still running.

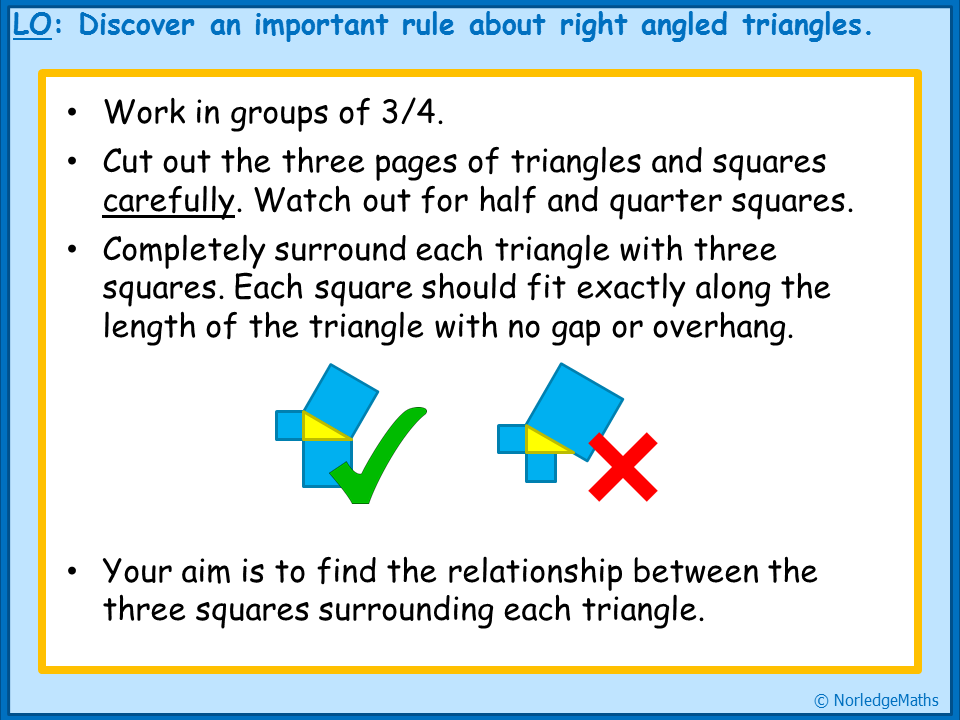
You need a selection of pre-drawn triangles and squares on centimetre paper. Include the typical 3, 4, 5 and 6, 8, 10 triangles, but some simple ones with half-units also work quite well. You also need a large piece of paper (two sheets of A3 stuck together does the trick) and glue for each pair or group. Alternatively, follow the links to download my version.

Give the pupils the pieces of paper (or cut them out beforehand if you’re feeling generous), with the instruction that they need to completely surround each triangle with three squares. If they are cutting, make sure they do it accurately – I’ve previously had pupils “correct” my squares by cutting the half-squares off the end! It’s worth checking their work carefully before you let them glue it down, as some have a tendency to match up in a “that will do” way, rather than making sure the squares are exactly the right length.

Once they’ve done this, I ask them to work out the area of each square (they can do this by counting or multiplying), then look for a link, annotating on their posters as they go. Towards the end, I pull the class back together and we discuss what we’ve found out. Depending on where I’ve judged their understanding, I’ll go straight to the algebraic representation or leave this for the next lesson.

I also like to tell the pupils a story my dad told me when he taught me Pythagoras’ theorem; I vividly remember sitting in our dining room at home, looking at the square tiles on the floor, and hearing about Pythagoras pacing around the temple in Samos looking at patterns on the floor, and this was how he came up with his theorem.

Obviously, this story has absolutely no historical basis whatsoever, but it works mathematically, so it’ll do for me!

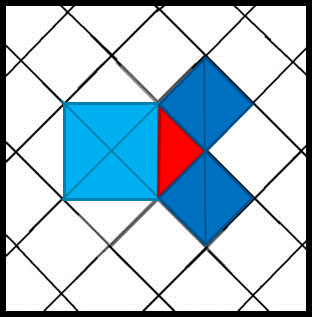
Pythagoras tiling: Two smaller dark blue squares make one large light blue square.

2. Formalise using algebra

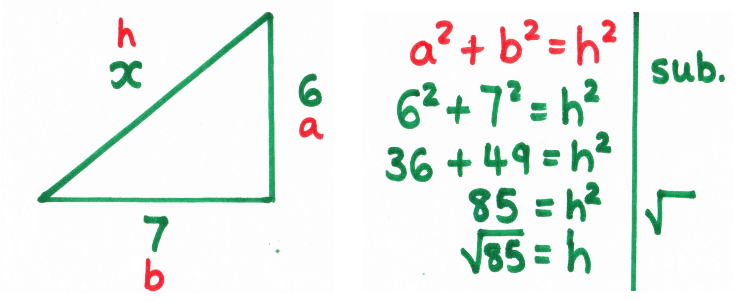
I usually then spend some time working on developing and formalising an algebraic approach – I think this is important for embedding algebraic manipulation skills and can avoid issues with whether to add or subtract the areas. Getting pupils in the habit of labeling their sides (a, b and h) helps when introducing trigonometry later. I use the same line “notation” I use when solving equations to reinforce links between substitution into a formula and solving strategies.

Picture

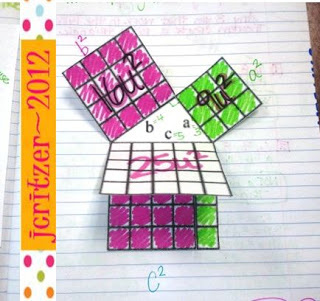
Last year I used a fantastic idea I found on Math Foldables to get pupils to create a little visual reminder that Pythagoras’ theorem is linked to the area of the squares on the sides.

Picture

Then it’s time for lots of examples and independent practice! No escaping this – pupils need to spend the time working through problems themselves. One thing I do differently now to when I started teaching is mix up hypotenuse and short side problems; teaching them separately just encourages pupils to learn one method for one and one for the other, whereas they really need to be able to identify if they’re trying to find a hypotenuse or a short side.

3. Don’t shy away from surds

I think this is particularly important for groups of pupils who may go on to A Level, as I still have pupils who don’t understand that the decimal answer a calculator gives is an approximation, not the “exact value”. If your scheme of work allows, teach surds first. Then there’s lots of scope for practising surd simplification at the same time. If not, don’t get the calculators out until they’ve shown they are happy to leave their answers as surds.

4. REAL real life applications

Pythagoras’ theorem is actually really useful for creating right angles in construction or building. Builder’s squares work on the inverse of Pythagoras’ theorem (that if a² + b² = h² then the triangle must contain a right angle). I’ve also used string knotted at intervals to create a 3, 4, 5 triangle to show that, when pulled out straight, it creates a right angle. 

5. If all else fails…

We all know that teaching for understanding goes out the window before exams, so if you’ve got pupils who still don’t get Pythagoras’ theorem, SASH (Square Add Square Root to find the Hypotenuse) and SSSS (Square Subtract Square Root to find a Short Side) have worked for me as a very last minute fix.

Teaching Pythagoras’ theorem Read More »